Propiedades de material de Grease Pencil
Grease Pencil materials define how strokes and fills are rendered. Each stroke references a single material, and that material contains separate settings for its Stroke and Fill components.
The Material Properties panel provides tools to manage material slots, control visibility and locking, and configure the appearance of stroke and fill shading.
Contenedores de materiales
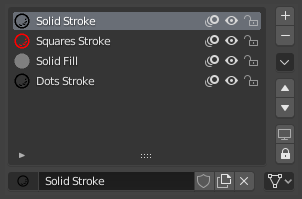
Panel de contenedores de materiales de Grease Pencil.
Material slots assign materials to the Grease Pencil object. Each stroke stores a reference to one of these material slots.
The active material is used for newly created strokes. Existing strokes keep their assigned material unless changed manually.
Next to each material name are controls for common visibility and editing options:
- / (Show/Hide in Ghosts)
Controls whether the material is visible in Onion Skinning previews.
- / (Mostrar/Ocultar material)
Toggles the visibility of strokes using this material in the viewport.
- / (Bloquear/Desbloquear material)
Prevents strokes using this material from being edited in Edit Mode.
Especiales
These operators provide bulk control over material visibility and locking:
- Mostrar todo
Enable visibility for all materials.
- Ocultar otras
Hide all materials except the active one.
- Bloquear todo
Lock all materials to prevent editing.
- Desbloquear todo
Unlock all materials for editing.
- Bloquear no seleccionados
Lock materials not used by the currently selected strokes.
- Bloquear no usados
Lock and hide materials not assigned to any stroke.
- Copiar material a seleccionados
Copy the active material to selected Grease Pencil objects.
- Copiar todos los materiales a seleccionados
Copy all material slots to selected Grease Pencil objects.
- Eliminar contenedores no usados
Remove material slots that are not assigned to any strokes.
Controles de visibilidad y bloqueo
- (Isolate Material)
Lock all other materials so only the active material can be edited.
- (Isolate Material)
Hide all other materials so only the active material is visible.
Superficie
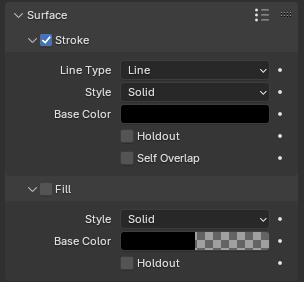
Shader panel with only Stroke component enabled.
The Surface panel defines the visual appearance of strokes and fills. Each material contains two independent components:
Stroke – Controls the outline rendering.
Fill – Controls the interior rendering of closed strokes.
Each component can be enabled or disabled independently.
Trazo
The Stroke component defines how the line itself is drawn.
- Tipo de línea
Defines how the stroke geometry is rendered.
- Línea:
Renders a continuous line connecting stroke points.
- Puntos:
Draws a circular shape at each stroke point. Points are not connected.
- Cuadrados:
Draws a square shape at each stroke point. Points are not connected.
- Estilo
Determines how the stroke is shaded.
- Sólido:
Uses a uniform base color.
- Textura:
Uses an image texture mapped along the stroke.
- Imagen
Image data-block used as the texture source.
- Fundido
Mix factor between the texture and the Base Color.
- Factor UV
Controls texture scaling along the stroke length.
- Placement Dots Squares
Defines how dots or squares are distributed along strokes.
- Cantidad:
Places a fixed number of dots on each stroke segment.
This mode keeps the number of generated shapes consistent regardless of the stroke length or thickness.
- Cantidad
Number of dots to place on each stroke segment.
- Radio:
Places dots based on the stroke radius, adapting the spacing to the stroke thickness.
Larger stroke radii produce wider spacing between dots, while smaller radii place them closer together.
- Espaciado
Distance between dots as a percentage of their diameter.
Lower values create overlapping or tightly packed dots, while higher values increase the gap between each generated shape.
- Densidad:
Places dots based on the stroke length.
Longer strokes generate more dots while shorter strokes generate fewer, maintaining a more uniform visual density along the stroke.
- Densidad
Number of dots generated along the stroke length.
Higher values create more densely packed dots.
- Color base
The primary color of the stroke.
- Hueco
Makes the stroke act as a mask, removing color from underlying strokes and fills.
- Alineación
Controls orientation of Dots and Squares.
- Ruta (o Trayectoria):
Aligns to the drawing direction and object rotation.
- Objeto:
Aligns only to the object’s rotation.
- Fijo:
Aligns to screen space.
- Rotación
Rotates the Dots or Squares shapes. Limited to -90° to 90°.
- Superposición propia
Controls how overlapping parts of the same stroke blend, particularly with semi-transparent materials.


Aleatorizar
Adds random variation to generated dots or squares to create a less uniform appearance.
- Tamaño
Randomly varies the size of generated shapes.
Higher values increase the variation between larger and smaller dots.
- Intensidad
Randomly varies the opacity of generated shapes.
This can create a more natural or textured appearance.
- Rotación
Randomly rotates generated shapes around their center.
This is most noticeable when using square shapes.
- Tono
Randomly varies the hue of generated shapes.
- Saturación
Randomly varies the saturation of generated shapes.
- Valor
Randomly varies the brightness of generated shapes.
- Escala del ruido
Controls the scale of the random noise pattern.
Lower values create smoother variation across the stroke, while higher values produce more rapidly changing randomization.
Rellenar (o Relleno)
The Fill component controls rendering of closed stroke regions.
- Estilo
Defines how the fill is shaded.
- Sólido:
Uses a single base color.
- Gradiente:
Blends between two colors.
- Tipo de gradiente
- Lineal:
Blends along one axis.
- Radial:
Blends outward from a center point.
- Textura:
Uses an image texture.
- Imagen
Image data-block used for the fill texture.


- Color base
Color base de relleno.
- Color secundario Gradiente
Color secundario usado para gradientes.
- Hueco
Makes the fill act as a mask, removing color from strokes underneath.
- Fundido Gradiente / Textura
Controls mixing between Base Color and the gradient or texture.
- Invertir colores Gradiente
Intercambiará los colores base y secundario.
- Posición X, Y Gradiente / Textura
Offsets gradient or texture coordinates.
- Rotación Gradiente / Textura
Rotates the gradient or texture mapping.
- Escala X, Y Gradiente / Textura
Scales the gradient or texture mapping.
- Recortar imagen Textura
Prevents texture tiling when enabled.
Opciones
- Identificador en pasada
Custom integer identifier for use in modifiers and compositing. Can be used to target specific materials in Grease Pencil Modifiers.