Introducción
El Editor de UV podrá ser usado para editar mapas UV, que describirán la forma en que se debe mapear una imagen 2D sobre un objeto 3D.
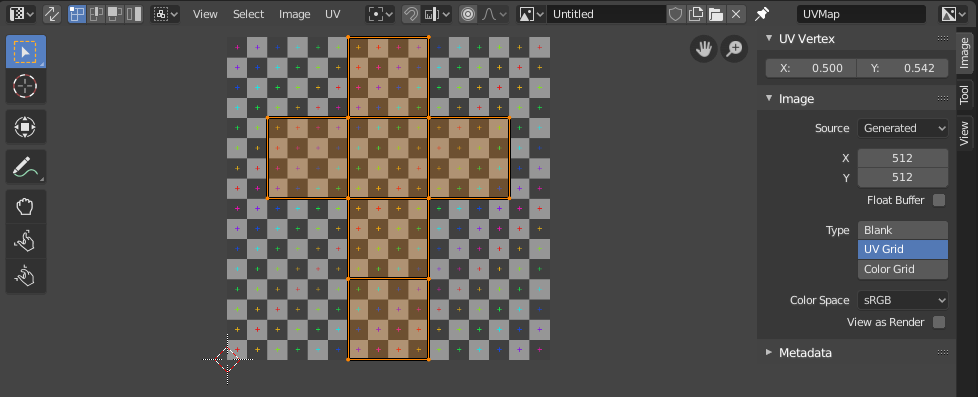
Editor de UV con un mapa UV y una textura de cuadrícula de prueba.
Las texturas de imagen suelen ser necesarias cuando el aspecto deseado sea difícil de lograr con texturas procedimentales o en caso de que la textura no fuera uniforme. Por ejemplo, un automóvil debería tener rasguños solamente en algunos lugares en donde tuviera sentido encontrarlos, no en lugares aleatorios por toda su carrocería.
Blender ofrece una serie de proyecciones (Caja, Esfera…) que aplicarán automáticamente una imagen 2D a un objeto 3D, pero tenderán a funcionar bien sólo en mallas simples. Para otras más complejas, deberá crearse un mapa UV en su lugar. Un mapa UV es un área plana donde cada cara del objeto 3D será desplegada para asignarle determinados píxeles de la imagen 2D de la textura. Esto dará un control completo sobre el proceso de mapeo.
El nombre «UV» se refiere a los dos ejes del mapa: el U para la coordenada horizontal, y el V para la vertical. Esas letras fueron elegidas para evitar confusiones con las letras «X» e «Y», que suelen ser usadas para referirse al espacio 3D.
Explicación de las coordenadas UV
La mejor analogía para entender el mapeo UV es cortar una caja de cartón. Si se tomaran un par de tijeras y se cortara a lo largo de los bordes, podría ser extendida sobre una mesa. Mirando la mesa (hacia abajo), podríamos decir que U es la dirección de izquierda a derecha y mientras que V es la dirección de arriba hacia abajo.
Como siguiente paso, se podría colocar la caja desplegada encima de un póster, cortar el póster para que coincida con su forma, pegarlo a la caja y finalmente volver a armar la caja. Así es como se obtiene una caja 3D texturizada con una imagen 2D.
Un mapa UV describirá, entonces, cómo las caras de la malla se distribuyen sobre la textura. Existirá una total libertad para hacer esto: si así se deseara, será posible cortar y separar cada cara y posicionarla, rotarla, escalarla e incluso sesgarla sobre la textura, independientemente de las demás. Aún más, las caras podrán superponerse en el mapa UV, haciendo que compartan la misma parte de la textura.
Ejemplo
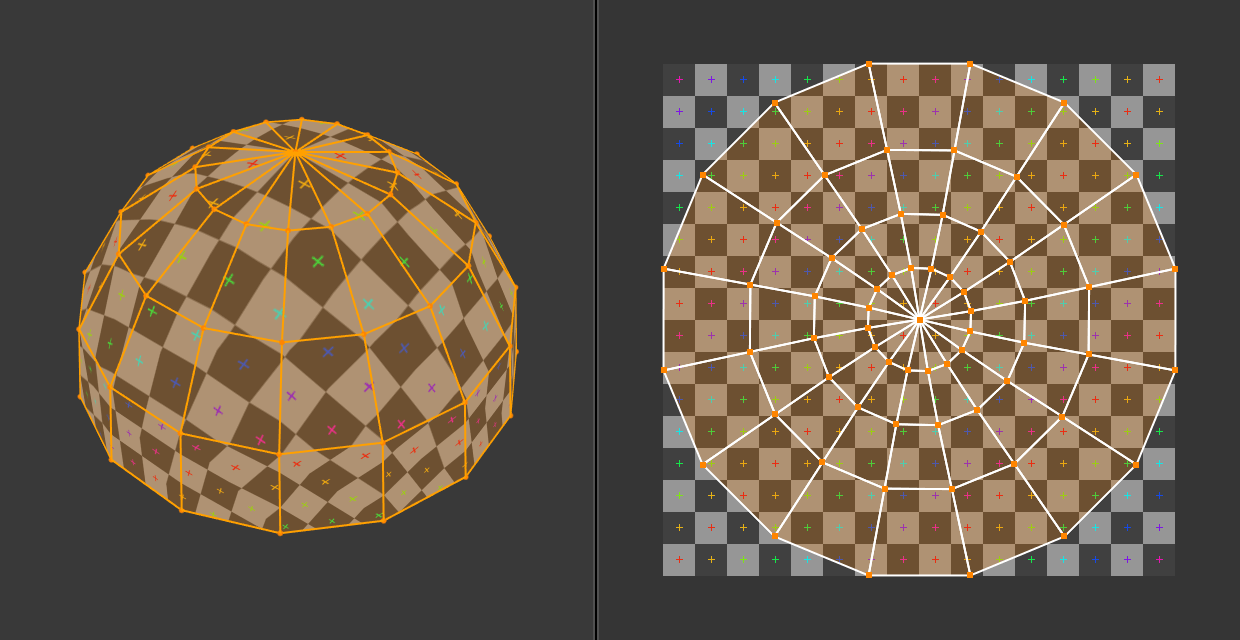
El espacio 3D (XYZ) comparado con el espacio UV.
En la imagen de arriba, una cúpula en el espacio 3D se aplana en un disco en el espacio UV. Luego, cada cara 3D se texturiza con la parte de la imagen que cubre en el mapa UV.
La imagen también demuestra un problema común en los mapas UV: la distorsión. Observe cómo, aunque los cuadrados cuadriculados en la textura 2D son todos del mismo tamaño, adquieren diferentes tamaños cuando se aplican a la cúpula 3D (son más pequeños en la base que en la parte superior). Esto se debe a que las caras en el mapa UV tienen diferentes tamaños relativos que en el espacio 3D, lo cual es el resultado del proceso de aplanamiento.
Por lo general, querrá minimizar esta distorsión guiando y ajustando manualmente el aplanamiento, usando costuras por ejemplo. Sin embargo, no siempre es posible eliminarlo por completo.
Interfaz
Encabezado

Encabezado del Editor UV.
El encabezado contiene varios menús y opciones para trabajar con UV.
- Sincronizar selección
Sincroniza la selección entre el Editor de UV y la Vista 3D. Ver Sincronizar selección para más detalles.
- Modo de selección
El tipo de elemento UV a seleccionar. Ver Modo de selección para más detalles.
- Modo de selección permanente
Qué otros vértices seleccionar automáticamente. Ver Modo de selección permanente para obtener más detalles.
- Vista
Herramientas para controlar cómo se muestra el contenido en el editor. Ver Navegación.
- Seleccionar
Herramientas para seleccionar UV.
- Imagen
Herramientas para abrir y manipular imágenes. Ver Editing Images.
- UV
Contiene herramientas para Desenvolver Mallas y Editar UV.
- Punto de pivote .
- Adherir Mayús-Tab
Ver Adherencia.
- Edición proporcional O
Ver Edición proporcional.
- Imagen
Un menú de bloque de datos usado para seleccionar imágenes. Cuando una imagen es cargada o creada en el Editor UV, el panel Imagen aparece en la región de la Barra Lateral.
- Fijar imagen
Cuando está habilitado, la imagen actual permanece visible independientemente de la selección del objeto. Este cambio sólo ocurre si la Vista 3D está en el Modo Edición o en Modo Pintar Texturas.
Esto puede ser útil para habilitar cuando se usa una imagen como referencia.
- (Show Gizmo)
Permitirá mostrar u ocultar todos los manipuladores con el botón de alternancia o manipuladores específicos, mediante el panel desplegable.
- Navegación
Activa/desactiva los manipuladores utilizados para desplazar o ampliar la vista 2D. Ver Manipuladores de navegación para obtener más información.
- Mostrar sobreimpresos
Permite mostrar/ocultar todos los sobreimpresos usando el botón de alternar o sobreimpresos específicos usando el menú desplegable. Ver UV Overlays.
- Mapa UV activo
Selecciona qué mapa UV utilizar.
- Canales a mostrar
Selecciona qué canales de color se muestran.
- Color y alfa:
Habilitará la transparencia, mostrando un damero detrás de la imagen.
- Color:
Muestra la imagen coloreada, sin el canal alfa.
- Alfa:
Mostrará el canal alfa como una imagen en escala de grises. Las áreas blancas serán opacas y las negras transparentes.
- Buffer Z:
Mostrará la profundidad desde la cámara, desde el Inicio de recorte hasta el Fin de recorte de la cámara, tal como se especifica en las Opciones de cámara.
- Rojo, Verde, Azul:
Mostrará uno de los canales de color de la imagen, como escala de grises.