Adherencia
Referencia
- Modo:
Modos Objeto, Edición y Pose
- Posición:
- Atajo:
Mayús-Tab
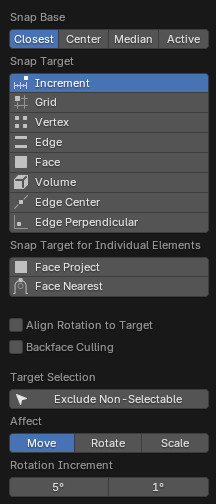
El panel desplegable Adherencia.
Snapping makes it easy to align objects and mesh elements to others. It can be toggled by clicking (Snap Off) / (Snap On) in the 3D Viewport’s header, or more temporarily by holding Ctrl.
Ver también
Transform Modal Map for further keyboard shortcuts.
Base de adherencia
Referencia
- Modo:
Modos Objeto, Edición y Pose
- Encabezado:
- Atajo:
Mayús-Ctrl-Tab
Determines which point in the geometry will snap to the target.
- Más cercano:
Snaps using the bounding box corner (in Object Mode) or vertex (in Edit Mode) that’s closest to the target.
- Centro:
Snaps using the current transformation center, which is another word for the pivot point. This option is especially useful in combination with the 3D Cursor for choosing the snapping point completely manually.
- Centroide:
Snaps using the average position of the selected objects” origins (in Object Mode) or vertices (in Edit Mode).
- Activo:
Adherirá usando el origen del objeto activo (en modo Objeto) o el centro del elemento activo (en modo Edición).
Objetivo de adherencia
Referencia
- Modo:
Modos Objeto, Edición y Pose
- Encabezado:
- Atajo:
Mayús-Ctrl-Tab
Permite determinar el objetivo al que se adherirá la selección.
- Incremento:
Snaps to an imaginary grid that starts at the selection’s original location and has the same resolution as the viewport grid. In other words, it allows moving the selection in «increments» of the grid cell size.
- Cuadrícula:
Adherirá a la cuadrícula que se muestra en la vista.
- Vértice:
Adherirá al vértice más cercano al puntero del ratón.
- Borde:
Adherirá al borde más cercano al puntero del ratón.
- Cara:
Snaps to the surface of the face under the mouse cursor. This is useful for retopologizing.
- Volumen:
Adherirá la selección a una profundidad que estará centrada en el interior del objeto que se encuentre bajo el puntero. Esto resultará útil para posicionar un hueso de un esqueleto de modo que quede centrado dentro del brazo de un personaje, por ejemplo; las demás opciones de adherencia lo colocarían siempre sobre la superficie del brazo.
Aunque Blender también tiene objetos volumétricos esta opción no está relacionada con ellos.
- Centro de borde:
Adherirá al punto medio del borde más cercano al puntero del ratón.
- Perpendicular a borde:
Adherirá a un punto específico sobre el borde, de tal manera que la línea desde la ubicación original de la selección (indicada por una cruz blanca) hasta su nueva ubicación sea perpendicular al mismo.
- Face Center:
Snaps to the centerpoint of the face under the mouse cursor.
Truco
Es posible activar múltiples modos de adherencia a la vez, usando Mayús-LMB.
Objetivo para elementos individuales
Referencia
- Modo:
Modos Objeto, Edición y Pose
- Encabezado:
- Atajo:
Mayús-Ctrl-Tab
- Caras (proyectando):
Individually snaps each object (in Object Mode) or vertex (in Edit Mode) to the face found by projecting from the current viewing depth along the current viewing direction. This can be used for bending a flat sheet so it snugly fits against a curved surface, for example.
- Caras (más cercano):
Individually snaps each object or vertex to the face that’s closest to its new location. Contrary to Face Project, this allows snapping to occluded geometry.
Ver también
Shrinkwrap constraint / modifier.
Selección de objetivo
Permite definir opciones de adherencia más detalladas. Las opciones disponibles dependerán del modo (Objeto/Edición) así como de la opción elegida en Objetivo de adherencia.
- Alinear rotación al objetivo
Rotate the selection so that its Z axis gets aligned to the normal of the target.
- Descartar caras traseras
Excluirá de la adherencia a la geometría orientada hacia el lado opuesto.
- Incluir activo modo Edición
Adherirá a los otros elementos de la malla del objeto activo.
This option is ignored if Proportional Editing is enabled.
- Incluir editados modo Edición
Adherirá a otros objetos que también se encuentren en modo Edición.
- Incluir no editados modo Edición
Adherirá a otros objetos que no se encuentre en modo Edición.
- Excluir no seleccionables
Snap only to objects that are selectable.
- Absolute Increment Snap Increment
Snap to the viewport grid (instead of moving by increments of the grid cell size). This is similar to setting the Snap Target to Grid, except that the latter moves the selection to the grid point closest to the mouse cursor.
- Adherir al objeto completo Volumen
If the target object is composed of several disconnected mesh islands that intersect each other, Snap To Volume will normally snap to the island under the mouse cursor, ignoring the others. Enabling Snap Peel Object instead treats the target object as one connected whole, looking only at the «peel» (outer surface) while ignoring inner/enclosed faces.
- Adherir a mismo objetivo Caras (más cercano)
Adherirá sólo al objeto que se encontrara más cerca de la selección antes de comenzar la transformación.
- Intervalo Caras (más cercano) modo Edición
Dividirá la transformación general en varios pasos, realizando una adherencia por vez. Esto podrá producir mejores resultados en ciertos casos.
Afectar
Specifies which transformations are affected by snapping. By default, snapping only happens while moving something, but it can also be enabled for rotating and scaling.
Incremento de rotación
Ángulo usado en la adherencia incremental para el operador de rotación. El segundo valor es el Incremento de rotación de precisión, usado para una transformación más detallada y activado al pulsar la tecla Mayús.