Creación de metarigs
Agregar un hueso desde el menú Agregar –> Esqueleto.
Ir al modo Edición del esqueleto y construir el metarig, mediante los ejemplos disponibles o los tipos de sistemas de control de Rigify.
Definir la interfaz para las colecciones de huesos de Rigify, los conjuntos de colores y los conjuntos de selección.
En las propiedades del esqueleto, hacer clic en el botón Generar sistema de control para generar el sistema de control final.
Cómo funciona Rigify
- Los metarigs de Rigify están divididos en múltiples sub sistemas de control
Un metarig es un conjunto de cadenas de huesos. Una cadena de huesos estará identificada con el atributo Conectado. Las cadenas de huesos podrán estar también conectadas mediante el uso de jerarquías, sin tener por qué usar el atributo Conectado (esto es, usando la opción Mantener transformaciones mientras se crea la jerarquía con el operador Asignar superior).
- Se crea un atributo personalizado en el primer hueso de la cadena del sub sistema de control
Cada primer hueso de una cadena de huesos tendrá un atributo personalizado, que será una propiedad personalizada de Rigify, para identificar el tipo de sub sistema de control. En el momento en generar el sistema de control, Rigify determinará qué controles y huesos deformantes serán creados, procesando el metarig desde el primer hueso hasta el último de cada cadena.
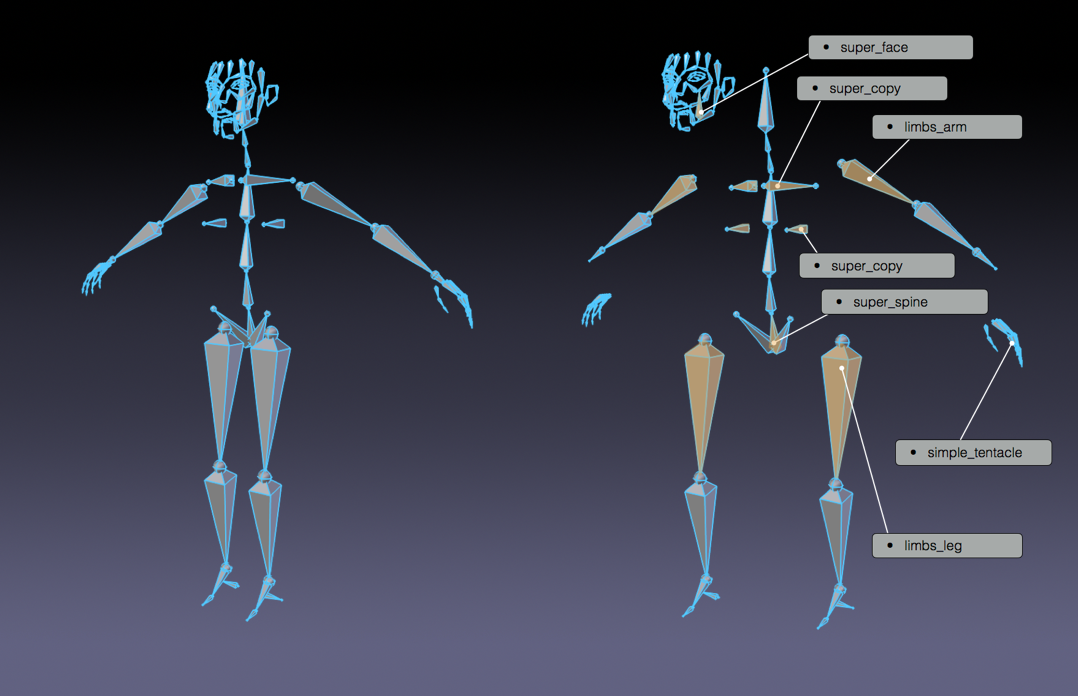
Meta-rig humano dividido en sus distintos modelos.
- Nuevos metarigs pueden ser creados ensamblando modelos de sub sistemas de control
Dado que un metarig es sólo una colección de sub sistemas de control, será posible crear nuevos metarigs ensamblando sub sistemas de control de distintas formas. De esta manera, será posible crear un número infinito de metarigs a partir de los mismos bloques de sistemas de control.
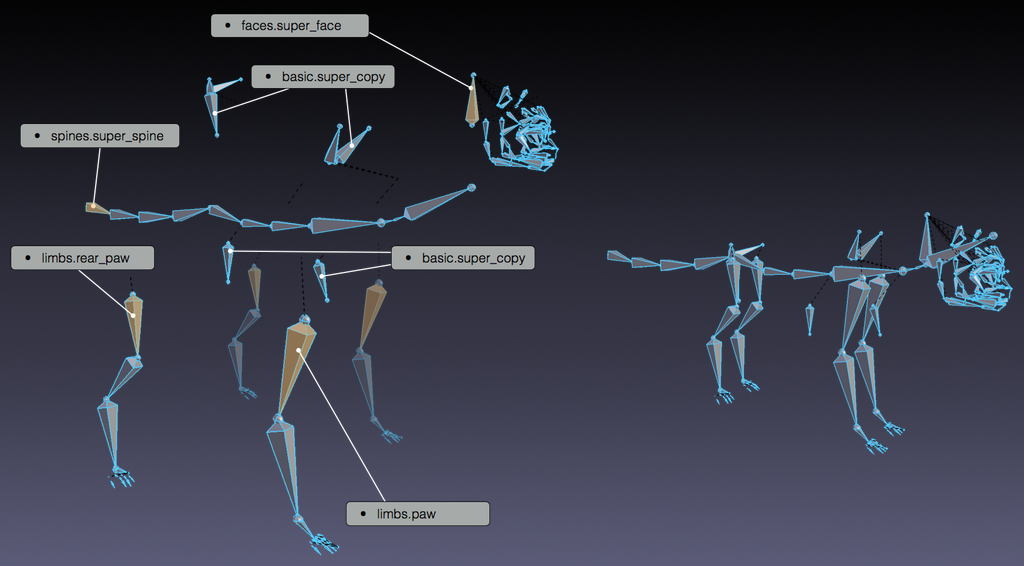
Metarig de Gato, construido a partir de modelos.
- Todos los mecanismos, huesos deformantes y controles son creados con un solo clic
El metarig contiene más información que los huesos mostrados. En efecto, en el momento de la generación, Rigify identificará cada tipo de sub sistema de control y, dependiendo de las opciones seleccionadas, creará todos los controles, interruptores y huesos deformantes con un solo clic.
Creación de un nuevo metarig
Agregar un nuevo esqueleto
Referencia
- Modo:
Modo Objeto
- Menú:
- Atajo:
Mayús-A
Para crear un metarig desde cero se necesitará un esqueleto con el cual trabajar. Bastará con agregar un Hueso individual desde el menú Agregar.
Truco
En este punto, será una buena idea dar un nombre al nuevo esqueleto recién creado, lo llamaremos metarig. Esto podrá ser hecho en cualquier momento (o no hacerse nunca) pero se sugiere hacerlo antes de continuar, para que quede siempre claro en qué esqueleto se deberá trabajar cuando se esté editando la estructura del metarig.
Edición del esqueleto
Ahora que ya hay un esqueleto con el cual trabajar (y con el mismo seleccionado) ingresar al modo Edición. La construcción de un metarig desde cero en modo Edición puede ser hecha de dos maneras:
La adición de modelos de sistemas de control.
La creación de cadenas de huesos.
Adición de modelos (básico)
La adición de modelos predefinidos en modo Edición es una buena forma de comenzar a construir un metarig. De esta manera se podrá ganar familiaridad con los bloques de construcción disponibles y con la forma en que éstos deberían ser usados. Para agregar un modelo de sistema de control:
Ir a la pestaña Esqueleto.
Desplazar hacia abajo, hasta encontrar el panel Rigify.
Seleccionar un modelo de la lista.
Hacer clic en el botón Agregar modelo.
Editar las posiciones de los huesos para que coincidan con el personaje.
Para obtener la lista de modelos disponibles, ver la sección Tipos de sistemas de control.
Uso de tipos de sistemas de control (avanzado)
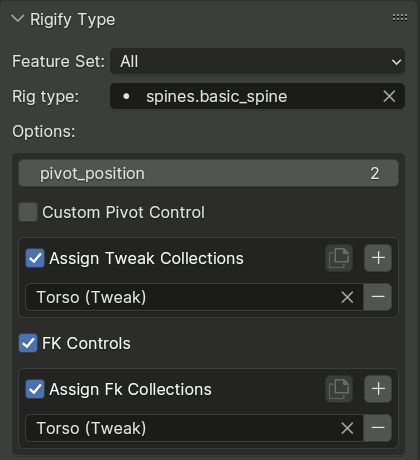
Para un control completo, en modo Pose, será posible usar el panel Tipo de sistema de control, en las propiedades de Hueso, para asignar cualquier tipo de sub sistema de control de Rigify a cualquier hueso, así como cambiar sus opciones.
Para la lista de tipos de sub sistemas de control disponibles, ver la página Tipos de sistemas de control.
En la parte superior del panel, será posible encontrar un campo para especificar el tipo de sistema de control para el hueso activo. La lista desplegable podrá ser opcionalmente filtrada, según el Conjunto de características al cual pertenezca cada sistema de control.
Debajo de eso, será posible cambiar opciones relevantes para el tipo de sistema de control, si correspondiera.
Referencias a colecciones de huesos
Algunos tipos de sistemas de control que generan muchos huesos de control contienen opciones para referenciar Colecciones de huesos. Estas listas de referencia usan una interfaz estándar, con las siguientes características:
Una casilla de verificación para controlar si la referencia debe ser usada.
Un botón para copiar el contenido de la lista de referencias, desde el hueso activo a todos los demás seleccionados.
Un botón + para agregar una nueva referencia a la lista.
Una lista de referencias, cada entrada con un campo para especificar la colección objetivo y un botón para eliminar la entrada de la lista.
Nota
Cada sub sistema de control tendrá uno cierto requerimiento de huesos de entrada. En caso de no estar seguro acerca de cómo usar las propiedades de los tipos de sistemas de control, agregar un modelo de sistema de control al esqueleto para ver cómo se supone que sea usado.
Propiedades de huesos preservadas
Ciertas propiedades de los huesos del metarig serán a menudo copiadas a los huesos de control, deformación y mecanismo del sistema de control generado.
El conjunto exacto dependerá de cada sub sistema de control y del hueso específico generado, además el sub sistema de control podrá redefinir algunas propiedades, incluso cuando preserve otras del mismo subconjunto; aún así existirán ciertos patrones comunes:
- Opciones jerárquicas
Este subconjunto consiste en el hueso ORG superior, y las opciones Conectar, Heredar rotación, Posición local y Heredar escala.
Será habitualmente copiado a los huesos deformantes, controles de cinemática directa (FK), así como en otros casos en donde el sub sistema de control no tenga una razón para redefinirlos por completo.
- Opciones de huesos flexibles (modo Edición)
Consistentes en cantidad de segmentos, modo de mapeo de vértices, curvatura, giro, escala y suavizado.
La cantidad de segmentos será a menudo redefinida mediante alguna opción de un sub sistema de control, pero las otras opciones usualmente serán copiadas a los huesos deformantes sin modificaciones.
- Opciones de transformación
Consisten en el modo de rotación, los valores de rotación del modo Pose y el bloqueo de los canales.
Estas opciones son usualmente copiadas a los controles de cinemática directa (FK).
- Propiedades personalizadas
Usualmente copiado a uno de los controles generados, basado en el hueso del metarig (principalmente para FK). Los controladores internos del esqueleto que accedan a la propiedad serán redirigidos a la instancia copiada.
- Control personalizado
Usualmente copiado a uno de los controles generados, basándose en el hueso del metarig (principalmente FK); suprimirá la generación automática de un control para el hueso, cuando así se especifique.
Hueso principal personalizado
En caso de que el metarig contuviera un hueso llamado root, éste será usado como el hueso de control principal, en vez de crear uno nuevo. Esto permitirá cambiar la posición de reposo del hueso principal, asignando un control personalizado o agregando propiedades personalizadas al hueso.
Un hueso principal personalizado no deberá tener ningún superior y deberá usar el tipo de sub sistema de control basic.raw_copy o no usar ninguno.
Conjuntos de colores
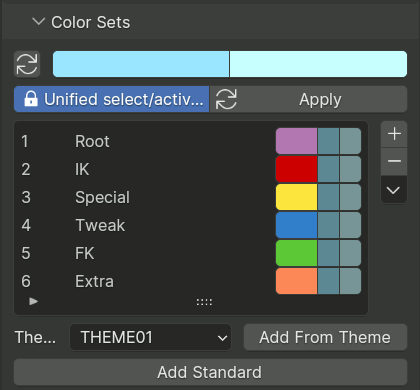
El panel Conjuntos de colores es usado para definir el esquema de colores de huesos para el sistema de control final. Los colores de la lista podrán ser asociados a las colecciones de huesos del panel relevante.
Las dos primeras filas del panel Conjuntos de colores son usadas para definir el comportamiento general de los colores de huesos. Usualmente los temas de colores utilizan un gradiente de colores para definir el estado de los huesos: normal, seleccionado y activo. Cuando se utilizan varios temas de color dentro del mismo sistema de control, identificar qué hueso se encuentra seleccionado o activo podría resultar difícil, dado que cada color poseerá su estado correspondiente.
Para redefinir este comportamiento, Rigify permite unificar los estados seleccionado y activo, usando el mismo color. Este será definido mediante dos valores:
- Unificar colores
Cuando esta opción se encuentre activa al agregar un grupo de huesos a la lista siempre se mantendrán los colores consistentes. Cuando un esquema de colores sea agregado a partir de un tema, el esquema de color será cargado tal cual es. Hacer clic en el botón Aplicar para forzar a que el sistema unifique los colores para los huesos, cuando están seleccionados o activos.
- Colores seleccionado/activo
Estos dos campos de color definirán respectivamente los colores de los cuando estén seleccionados o activos. De forma predefinida, Rigify leerá estos colores a partir del tema definido por el usuario en las preferencias de Blender. De esta forma, los colores de Seleccionado/Activo siempre podrán tener un comportamiento predecible y consistente en la interfaz. Los colores podrán ser personalizados haciendo clic en el campo de color correspondiente. Para restablecerlos al valor del tema actual de Blender, bastará con hacer clic en el botón con el ícono de actualización.
Los conjuntos de colores podrán ser agregados y borrados haciendo clic en los botones + o -. Todos los conjuntos de colores podrán ser borrados al mismo tiempo haciendo clic en el menú Especiales de conjuntos de colores.
Para agregar a la lista los colores del esquema de colores predefinido de Rigify (tal como se muestra en la imagen), hacer clic en el botón Agregar estándar.
Para agregar un tema específico, con su propio esquema de colores, se deberá seleccionar en la lista desplegable y luego hacer clic en el botón Agregar desde tema.
Interfaz
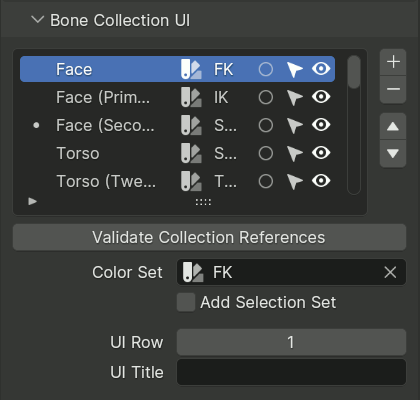
Las colecciones de huesos son usadas para agrupar huesos relacionados entre sí, de manera que puedan ser ocultados y mostrados en conjunto.
Rigify es capaz de sacar partido de las colecciones para generar características adicionales, así como la interfaz de usuario para el sistema de control final. Una panel llamado Rig Layers (Capas del sistema de control) será generado, conteniendo botones para ocultar las colecciones, organizado de una forma intuitiva.
El panel Interfaz permitirá configurar la organización de ese panel generado, así como especificar algunas otras opciones para las colecciones de huesos, tales como el conjunto de colores que deberán usar.
La parte superior del panel estará ocupada por una lista que duplicará la de la lista principal de colecciones de huesos, pero que mostrará algunas propiedades adicionales, tales como el conjunto de colores a usar, si la colección tendrá un botón en la interfaz o si generará un conjunto de selección.
- Validar referencias a colecciones
Algunos tipos de subsistemas de control contendrán referencias a colecciones de huesos en sus propiedades. Rigify utiliza un esquema de referenciamiento robusto frente a cambios en los nombres de las colecciones, sin embargo la eliminación de colecciones o la fusión de esqueletos aún serán capaces de derivar en la pérdida de referencias.
Este botón ejecutará una revisión que validará y normalizará todas las referencias a colecciones, reportando cualquier error y reduciendo las posibilidades de que acciones subsiguientes del usuario causen nuevas pérdidas de referencias.
Esta revisión será también llevada a cabo automáticamente cada vez que el sistema de control sea generado.
Advertencia
Para evitar la pérdida de referencias, esta operación debería ser usada tanto inmediatamente antes como después de unir dos esqueletos de metarigs. Más específicamente, debería ser realizada entre acciones de cambio de nombre y de unión de colecciones.
- Conjunto de colores
Especificará el conjunto de colores a ser usado para los huesos de esta colección. En caso de que un hueso perteneciera a varias colecciones, en general la colección ubicada más arriba en la lista tendrá prioridad.
- Agregar conjunto de selección
Permite especificar si se deberá generar un conjunto de selección para esta colección.
- Fila en interfaz
Cuando la opción sea distinta de cero, especificará qué fila del panel Rig Layers deberá contener el botón para controlar la visibilidad de esta colección. Cuando sea cero, no se generará ningún botón y la colección quedará oculta.
- Título en interfaz
Este campo podrá ser usado para redefinir el título usado en el botón de la interfaz, para que sea distinto del nombre real de la colección. Al contrario que los nombres de las colecciones, no es necesario que el nombre de los títulos sea único, por lo que esto podrá ser usado para reducir la complejidad al usar pistas contextuales para los nombres en el panel de la interfaz.
Organización de la interfaz (sub panel)

El sub panel Organización de la interfaz proporcionará un editor en donde se podrá apreciar la disposición gráfica de la interfaz final a ser generada (tal como es definida por las opciones Fila en interfaz y Título en interfaz).
Cada fila contiene tres botones, en el lado derecho:
- Flecha a izquierda
Moverá el botón de la colección activa a esta fila.
- Plus
Insertará una nueva fila antes de la actual.
- Minus
Eliminará la fila actual, desplazando todos los botones hacia arriba.
A la izquierda de los botones de control, las filas mostrarán los botones correspondientes a las colecciones, con la misma disposición que en la interfaz final, excepto que en vez de ocultar o mostrar las colecciones, al hacer clic en estos botones se seleccionará la colección correspondiente.
En el caso de la colección activa, el botón seleccionado será reemplazado por un campo de entrada para editar el nombre del botón en la interfaz, así como un botón con una X para quitar la colección de la misma.
Los botones de las colecciones no asignadas a la interfaz serán mostrados en una sección separada al final del sub panel.
La colección principal Root será agregada de forma automática y le será asignado un botón en la interfaz, en caso de ser necesario, cuando el sistema de control sea generado. Cuando se desee, será posible asignar manualmente botones en la interfaz para las colecciones internas ORG, DEF y MCH.
Truco
Las filas vacías aparecerán mucho más delgadas en la interfaz final, dado que no tendrán que contener los botones y, por lo tanto, podrán ser usadas como separadores lógicos entre botones.
Acciones
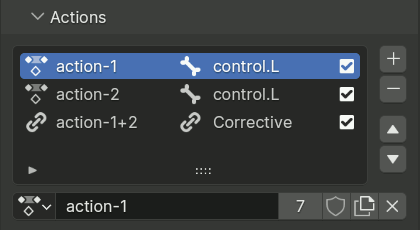
La restricción Acción permite aplicar a huesos poses definidas por una acción, basándose en la transformación de otro hueso. Esto requerirá agregar la restricción a cada hueso afectado por la acción, lo cual es muy tedioso. Por esta razón, Rigify incluye un sistema para hacer esto de manera automática, mediante el panel Acciones.
El panel definirá una lista de acciones a ser aplicadas a los huesos del sistema de control generado. Cada acción sólo deberá ser listada una única vez.
Las entradas de la lista mostrarán el nombre de la acción, el disparador (que será un hueso o una acción correctiva controlada por otras dos acciones) y una casilla de verificación que podrá ser usada para desactivar temporalmente la aplicación de esta acción al sistema de control. El ícono a la derecha de la entrada cambiará entre un ícono de acción y uno de vínculo, para resaltar a las acciones correctivas que dependan de otras normales o a las acciones normales usadas por la acción correctiva activa.
Nota
Las restricciones Acción serán agregadas a los huesos en un cierto orden necesario para reproducir exactamente la deformación esperada, asumiendo que las acciones hubieran sido creadas (posadas y animadas) en el orden en que aparecen en la lista.
Acciones normales
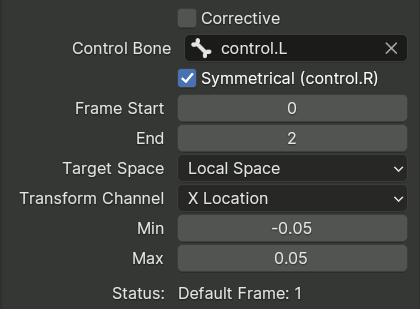
Las acciones normales serán aplicadas basándose en las transformaciones de un hueso de control específico del sistema de control generado. Presentarán las siguientes propiedades:
- Hueso de control
Permitirá especificar el hueso que controlará a la acción.
- Simétrica
En caso de que el hueso de control tuviera un sufijo que indicara que pertenece al lado izquierdo o derecho, será posible activar esta opción para aplicar automáticamente una simetría.
Cuando esta opción se encuentre activa, los huesos del lado izquierdo animados en la acción serán controlados por el control del lado izquierdo, mientras que los huesos del lado derecho será controlados por el control del lado derecho. Se asumirá que los huesos cuyos nombres que no contengan un sufijo indicativo de lado, pertenecen al centro del personaje. En el sistema de control contendrán dos restricciones Acción con influencias de 0.5, que serán controladas por cada uno de los huesos de control.
- Fotograma Inicio, Fin
Estas opciones permitirán especificar el rango de fotogramas de la acción, que será usado por las restricciones creadas.
- Espacio del objetivo, Canal de transformación
Estas opciones permitirán especificar el espacio de coordenadas y el canal de transformación del hueso objetivo, que deberán ser usados.
- Mín, Máx
Estas opciones permitirán especificar el rango de valores del canal de transformación que será mapeado al rango de fotogramas de la acción.
- Fotograma predefinido
Mostrará el fotograma, dentro de la acción, que representará al valor neutro del canal de transformación (1 para escala, 0 para los demás), tal como sea calculado a partir de los valores especificados para el rango.
Acciones correctivas

Las acciones correctivas serán aplicadas en base al progreso de otras dos acciones de la lista y serán usadas para mejorar una pose, cuando sean usadas en conjunto.
- Fotograma Inicio, Fin
Estas opciones permitirán especificar el rango de fotogramas de la acción, que será usado por las restricciones creadas.
- Disparador A y B
Permitirán especificar las dos acciones que controlarán la corrección. Las filas en la interfaz contendrán botones para mostrar las opciones de estas acciones o para seleccionarlas en la lista de arriba.
El progreso de la acción correctiva, desde el fotograma inicial hasta el final, será calculado como el producto de los valores de progreso de las dos acciones disparadoras. Por lo tanto, su fotograma inicial será aplicado cuando alguna de las disparadoras se encuentre en su fotograma inicial y su fotograma final será aplicado cuando ambas se encuentren en su fotograma final.
Las acciones correctivas deberán encontrarse debajo de sus disparadoras en la lista, lo cual será impuesto mediante un reordenamiento implícito, en caso de no cumplirse la condición.
Truco
Las acciones correctivas se comportarán de una manera más intuitiva cuando ambas acciones disparadoras tengan su Fotograma predefinido en su fotograma inicial. En tal caso, para crear una acción correctiva:
Crear las dos acciones disparadoras, agregarlas al panel y generar el sistema de control.
Posar los controles de manera que ambas acciones disparadoras se encuentren completamente activadas en su fotograma final.
Posar y marcar claves para las correcciones necesarias en el fotograma final de la nueva acción, marcando a la vez claves para la pose neutral en su fotograma inicial.
Agregar la nueva acción creada al final de la lista en el panel y configurar sus opciones.