Storypencil#
Storypencil is an add-on that adds tools to help the storyboarding workflow using the video sequencer. It adds many features to help adding, editing and rendering linked scenes.
Activación#
Open Blender and go to Edit Menu, Preferences, then Add-ons.
Search for Storypencil, and activate the add-on.
Descripción#
Después de activar el complemento, va a poner botones en el secuenciador encabezado del video para controlar los clips de escenas conectadas: Editar, Nuevo y reproducir.
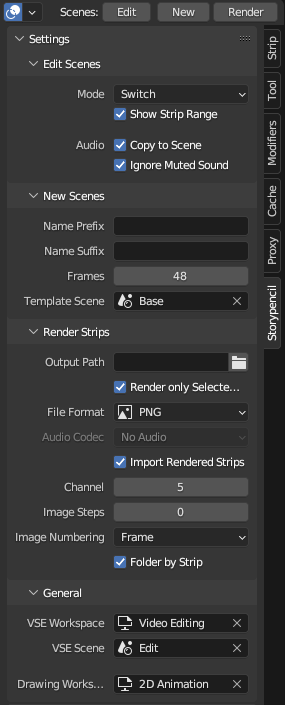
In the video Sequencer sidebar you will find a Storypencil tab with all the Settings for the add-on.
Utilización#
With the 2D Animation Template in Draw Mode, you can use the menu located in the and the add-on will take care to set up all the general settings and create the work-spaces and Scenes needed for the storyboard session.
Use los botones principales en el secuenciador encabezado del video para agregar, editar, y reproducir los clips de escena.
Nueva#
Add a new Scene Strip to the active channel based on the Base Scene selected in the add-on settings. The name of the new Scene Strip will use the prefix and suffix established on the settings.
Editar#
Opens the linked source scene under the timeline cursor in the video sequencer. There are two modes for editing source scenes, you can select the mode under Edit Scenes section in the Stoypencil panel.
New Window mode#
Storypencil will open the source scene in a new window keeping their timelines synchronized. When you finish editing the source scene you can close the opened window or keep it opened and control the timeline in the video sequencer to change to another scene.
This method is best suited when using multiple monitors.
Switching mode#
Storypencil will open the source scene switching to the proper Workspace at the same video sequencer cursor position. When you finish editing the source scene you can return to the video Sequencer using the Back button on the Dope Sheet header in the source scene Workspace.
Stoypencil will also temporarily copy the audio from the video sequencer edit to the source scene. This makes it easy to work on the scene with the audio in sync and without having to go back to the video sequencer each time.
This method is best suited when using only one monitor.
Importante
There is still a known issue when the Add-on is used together with a scene pinned to a workspace. Synchronization between scenes may fail.
Procesar#
Render all or only selected scene strips, depending on the Add-on Render Strips settings.
Opciones#
Edit Scenes#
- Modo
Set the mode to use while working with Storypencil
- Show Strip Range
When enabled, shows the IN/OUT range from the video sequencer in the scene dope sheet of the source scene. (Green and red lines)
- Timeline Synchronization (New Window Mode)
When enabled, keeps the video sequencer and source scene timelines in sync.
- Audio Copy to Scene (Switch Mode)
Temporally copy the audio from the video sequencer to the source scene.
- Audio Ignore Muted Sound (Switch Mode)
When copy the audio ignore the muted audio strips.
New Scenes#
- Name Prefix
Prefix that will be added to the name of new Scene Strips.
- Name Suffix
Suffix that will be added to the name of new Scene Strips.
- Fotogramas
Duration in frames for the new Scene Strips.
- Template Scene
The Scene used as base for Scene Strips. In this template Scene you can setup cameras, Grease Pencil objects, background objects, etc. to avoid start from scratch every time.
Render Strips#
If the render format is Movie the add-on will render one Movie clip per Scene strip using the video sequencer render settings. All rendered Movies will be imported (if Import Rendered Strips setting is enabled) as Movie clips on the selected channel.
If the render format is Image the add-on will render one image on each keyframe found in the source scene of the Scene strip using the video sequencer render settings. All rendered Images will be imported (if Import Rendered Strips setting is enabled) as Image Strips on the selected channel, the length used for the imported Image Clip will correspond to the gap between keyframes.
- Ruta de salida
Nombre del directorio donde se guardan las imágenes o videos procesados.
- Render Only Selected Strips
When enabled, only the selected Scene Strips will be rendered.
- Formato de archivo
Select the File Format to render the Scene Strips.
- Contenedor
Output file container to use.
- Compresor de audio
Compresor de audio FFmpeg a usar.
- Import Rendered Strips
When enabled, The Movie clips or images generated will be imported after rendered.
- Canal
The Channel to use for Movie clips or images imported after rendered.
- Image Steps
If greater than 0, when rendering images sets the number of images to generate between keyframes.
- Image Numbering
Sets the Numbering format for the generated images to use.
- Folder by Strip
When enabled, saves the images to the Output Path inside different folders with the Scene Strip name.
General#
- VSE Workspace
Workspace to use for video editing.
- VSE Scene
Scene to use as the main video editing scene.
- Drawing Workspace
Workspace to use for edit the source scenes.
Referencia
- Categoría:
Editor de video
- Descripción:
Storyboard tools.
- Posición:
Editor de video
- Archivo:
Storypencil folder
- Autor:
Antonio Vazquez, Matias Mendiola, Daniel Martinez Lara, Rodrigo Blaas
- Notas:
Este complemento viene incorporado con Blender.