Области
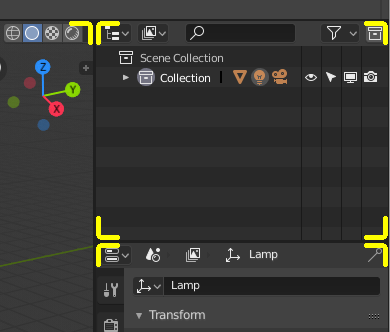
Границы области обозначены закруглёнными углами (жёлтые выделения).
Окно Blender’а разделено на несколько прямоугольников, называемых областями. Области резервируют место на экране для редакторов, таких как 3D-вьюпорт или аутлайнер. Каждый редактор предоставляет определённое направление функциональности.
Области сгруппированы в рабочие пространства, предназначенные для выполнения конкретных задач (моделирование, анимация и т. д.).
Примечание
Хотя некоторые сочетания клавиш в Blender’е являются глобальными (например, Ctrl-S для сохранения), многие из них зависят от того, над каким редактором находится курсор мышки.
Например, предположим, что вы только что выделили два объекта в аутлайнере, и хотите их объединить. Если вы нажмёте сочетание клавиш Ctrl-J, пока курсор всё ещё находится в аутлайнере – ничего не произойдет, поскольку эта команда сочетаний клавиш там недействительна; сначала вам нужно переместить курсор в 3D-вьюпорт.
Совет
Размер границы вокруг областей можно настроить в пользовательских настройках с помощью параметра „Ширины границы“.
Можно настроить отображение регуляторов таким образом, чтобы они всегда оставались видимыми, что может помочь при настройке размеров областей на устройствах с сенсорным экраном. См. раздел о настройке «Показать – Регуляторы по углам».
Изменение размеров
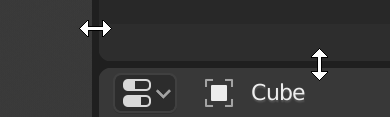
Areas can be resized by dragging their borders with LMB. Move the cursor over the border between two areas so that the cursor changes to a double-headed arrow, then click and drag.
Hold Ctrl to snap the size of areas to convenient sizes.
Hold Shift to move nearby aligned borders together while resizing.
Стыковка областей
Под «стыковкой» подразумевается несколько способов, с помощью которых пользователь может интерактивно управлять размером и расположением областей, а также разделять область на новые.
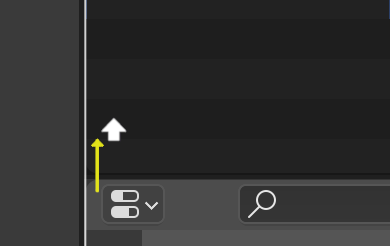
Чтобы начать интерактивный процесс, поместите курсор мышки в угол области, – вы увидите, как курсор изменится на крестик (+). Когда он станет крестообразным, нажмите и удерживайте ЛКМ, чтобы выполнить любое из следующих действий:
Если вы нажмёте Esc или ПКМ до того, как отпустите кнопку мышки, – операция будет отменена.
Объединение
Свойства присоединяются к Аутлайнеру.
Перетаскивание из угла области в пространство второй области – объединит эти две области. Области, которые будут объединяться, будут отображаться ярче.
Разделение
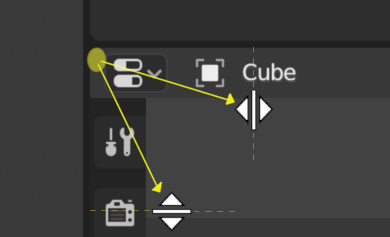
При разделении области создаётся новая область. Перетаскивание из угла области «влево/вправо» разделит область по вертикали, для разделения области по горизонтали перетащите «вверх/вниз».
Вы можете одновременно разделять и объединять области путём перетаскивания области из операции разделения в отдельную область.
Перетаскивание одной области в середину второй – заменит вторую область первой.
Параметры области
Нажатие ПКМ на границе открывает параметры области.
- Разделить вертикально/горизонтально (vertical/horizontal split)
Показывает линию индикатора, которая позволяет выбрать область и положение для разделения. Клавиша Tab переключает между вертикальным/горизонтальным разделением.
- Соединить вверх/вниз/влево/вправо (join up/down/left/right)
Показывает наложение направления соединения.
- Поменять местами области (swap areas)
Меняет местами эту область с соседней.
Замена содержимого
Вы можете поменять местами содержимое двух областей, нажав Ctrl-ЛКМ на одном из углов исходной области, перетащив курсор в нужную область и отпустив там мышку. Эти две области не обязательно должны располагаться рядом, но они должны находиться в одном окне.
Развернуть на всё окно (maximize area)
Ссылка
- Меню:
- Горячая клавиша:
Ctrl-Пробел
Расширяет область редактора так, чтобы она заполнила всё окно, при этом верхняя панель и строка состояния остаются видимыми. Это полезно в случаях, когда нужно сфокусироваться на одном редакторе (например, на 3D-вьюпорте, редакторе шейдеров) без изменения расположения элементов в рабочем пространстве.
При максимизации на весь экран области 3D-вьюпорта, – будут временно скрываться следующие элементы:
Чтобы вернуться к нормальному размеру, – снова воспользуйтесь сочетанием клавиш или нажмите кнопку „Back to Previous“ на верхней панели.
Восстановить области (restore areas)
Ссылка
- Меню:
- Горячая клавиша:
Ctrl-Пробел
Возвращает максимально развёрнутой области её исходный размер и восстанавливает предыдущую планировку экрана.
Режим фокусировки (focus mode)
Ссылка
- Меню:
- Горячая клавиша:
Ctrl-Alt-Пробел
Расширяет область редактора так, чтобы она занимала всё окно, скрывая при этом:
Верхнюю панель
Панель состояния
Вторичные регионы (например, панели инструментов, боковые панели, колонтитулы и т. п.) самого редактора.
В данном режиме активному редактору отводится максимально возможное пространство на экране.
Чтобы вернуться к нормальному размеру области, – воспользуйтесь тем же сочетанием клавиш или щёлкните значок в правом верхнем правом углу редактора (виден только при наведении курсора на эту часть области).
Дублировать область в новое окно (duplicate area into new window)
Ссылка
- Меню:
Позволяет создавать новое плавающее окно, содержащее копию текущей области редактора. Новое окно будет полностью функциональным и будет является частью того же экземпляра Blender’а.
Особенно полезно при работе с несколькими мониторами.
Совет
Вы также можете создавать новое окно из существующей области, нажав Shift-ЛКМ в любом углу области , а затем слегка перетащив её наружу.