Модификатор «Подразделение поверхности» (subdivision surface modifier)
Модификатор „Subdivision Surface“ (часто сокращенный на сленге до „Subdiv“ или „Subsurf“) используется для разделения граней меша на более мелкие грани, придавая поверхности однородный вид. Он позволяет создавать сложные гладкие поверхности при моделировании простых мешей с небольшим количеством вершин. Он позволяет избежать необходимости сохранять и поддерживать огромные объёмы данных и придаёт объекту плавный «органический» вид.
Как и в случае с любым другим модификатором, порядок его выполнения (положение в стеке модификаторов) имеет важное значение для результатов.
Обратите внимание, что эта операция отличается от сопутствующей ей операции „гладкого шейдинга“. Разницу между ними можно увидеть на иллюстрациях ниже.
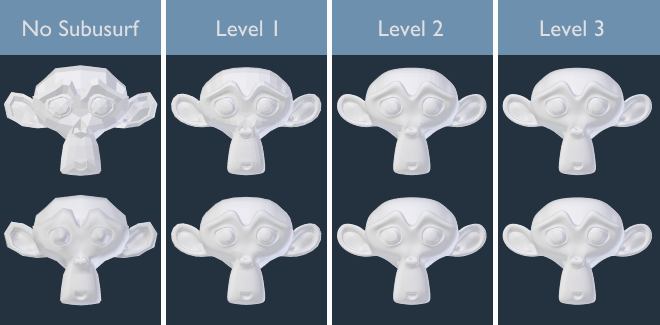
Уровни подразделения от 0 до 3, без и с гладким затенением.
Совет
Модификатор Subdivision Surface не позволяет редактировать новую подраздёленную геометрию без его „применения“, но с модификатором Multiresolution это возможно (в режиме скульптинга).
Примечание
This modifier uses the OpenSubdiv library as a backend.
Опции (options)
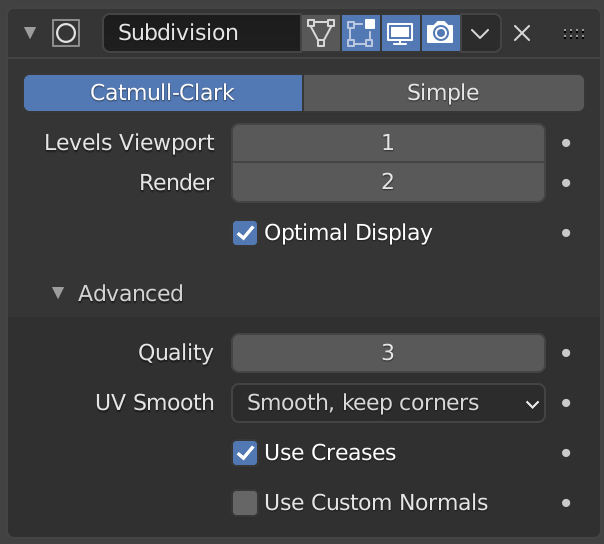
Модификатор Subdivision Surface.
- Кэтмулл-Кларк (Catmull-Clark)
Подразделяет и сглаживает поверхности, чтобы создать более приятный на вид меш. Согласно странице Википедии, «произвольно выглядящая формула была выбрана Кэтмеллом и Кларком на основе эстетического вида полученных поверхностей, а не на основе математического вывода.»
- Простой (simple)
Только подразделяет поверхности, этот тип алгоритма часто не обеспечивает никакого сглаживания, если поверхность не является копланарной (то же самое, что оператор Subdivide в режиме редактирования). Чтобы обойти это поведение для геометрии, которая не лежит в одной плоскости, – триангулируйте её, чтобы гарантировать, что вся геометрия является копланарной.
„Простой“ режим можно использовать, например, для увеличения разрешения базового меша при использовании карт смещения.
- Уровни - Вьюпорт, Рендеринг (levels viewport, render)
Количество уровней подразделения, отображаемых в 3D-вьюпорте или на финальном рендере.
Предупреждение
Более высокие уровни подразделений приводят к бо́льшему количеству вершин, что означает бо́льшее потребление памяти (как системной оперативной памяти, так и видеопамяти для отображения). Это может привести к зависанию или сбою Blender’а, если её будет недостаточно.
Совет
Правильная комбинация этих настроек позволяет вам сохранять быструю и лёгкую аппроксимацию вашей модели при взаимодействии с ней в 3D-вьюпорте, но использовать более качественную версию с бо́льшим числом уровней подразделения при рендеринге.
Будьте внимательны и не устанавливайте уровни подразделения „вьюпорта“ выше уровней для „рендеринга“, это будет означать, что качество в 3D-вьюпорте будет выше, чем при рендеринге.
- Упрощённый вид (optimal display)
При визуализации каркаса этого объекта – проволока новых подразделённых рёбер будет пропущена (отображаться будут только рёбра исходной геометрии).
Дополнительно (advanced)
- Использовать предельную поверхность (use limit surface)
Размещает вершины на поверхности, которая будет произведена с бесконечными уровнями подразделения (максимально гладкая форма, которая возможна).
- Качество (quality)
При включении опции „использования предельной поверхности“ – это свойство контролирует, насколько точно на ней будут располагаться вершины (относительно их теоретического положения бесконечно подразделённого меша). Качество можно уменьшить для повышения производительности.
Использование более высоких значений не обязательно означает реальное улучшение качества, идеальные результаты могут быть достигнуты задолго до максимального значения „Quality“.
Примечание
Это значение может повлиять на точность рёберных складок; использование более высокого значения „качества“ позволит точно работать более широкому диапазону значений складок.
- UV-Сглаживание (UV smooth)
Контролирует, как сглаживание подразделения применяется к UV-развёрткам.
- Нет* (none):
UV остаются без изменений.
- Сохранять углы (keep corners):
UV-островки сглаживаются, но их граница остаётся неизменной.
- Сохранять углы, стыки (keep corners, junctions):
UV сглаживаются, но при этом углы на прерывистой границе и соединениях трёх и более областей остаются острыми.
- Сохранять углы, стыки, вогнутости (keep corners, junctions, concave):
UV сглаживаются, но при этом углы на прерывистой границе, соединения трёх или более областей, а также выступы и вогнутые углы остаются острыми.
- Сохранять границы (keep boundaries):
UV сглаживаются, границы остаются острыми.
- Все (all):
UV и их границы сглаживаются.
- Сглаженность границы (boundary smooth)
Управляет сглаживанием открытых границ (и углов).
- Все (all):
Сглаженные границы, включая углы.
- Сохранять углы (keep corners):
Сглаженные границы, но углы остаются острыми.
- Со складками (use creases)
Использовать значения рёберных складок с назначенным весом, хранящиеся в самих рёбрах для того, чтобы управлять их сглаживанием.
- Пользовательские нормали (use custom normals)
Интерполирует существующие настраиваемые разделённые нормали полученного меша. В противном случае новые грани будут иметь общую ориентацию нормалей от своей исходной грани.
Адаптивное подразделение (adaptive subdivision)
Только Cycles
- Адаптивное подразделение (adaptive subdivision)
Производит подразделение объектов в зависимости от их расстояния до камеры, автоматически добавляя или уменьшая детализацию. Особенно полезно для передачи мелких деталей смещения.
- Адаптивный интервал (adaptive space)
- Пиксель (pixel):
Производить подразделение полигонов для достижения заданного размера пикселей на экране.
- Объект (object):
Производить подразделение для достижения заданной длины ребра в объектном пространстве. Это необходимо при использовании адаптивного подразделения для созданных экземпляров мешей.
- Размер пикселя (pixel size)
Целевой размер пикселя полигона для адаптивного подразделения.
- Длина ребра (edge length)
Целевая длина ребра в пространстве объектов для адаптивного подразделения.
Ограничения
Обработка данных с нескольких камер может выявить некоторые несоответствия между видами.
Инстансинг некорректно работает с подразделением пиксельного пространства. Подразделение будет производиться на основе положения исходного объекта относительно камеры, поэтому рекомендуется использовать объектное пространство.
Сочетания клавиш
Для того, чтобы быстро добавить модификатор Subdivision Surface к одному или нескольким объектам, – выделите объект(ы) и нажмите Ctrl-1. Это сочетание добавит модификатор Subdivision Surface с уровнем подразделения для вьюпорта, установленным на „1“. Вы также можете использовать и другие числа, такие как Ctrl-2, Ctrl-3 и т. д., чтобы добавить модификатор с этим количеством подразделений. Добавление модификатора Subdivision Surface таким способом не изменяет уровни подразделения для „рендеринга“.
Если у объекта уже есть модификатор Subdivision Surface, – это действие просто изменит его уровень подразделения вместо добавления другого модификатора.
Контроль
Тип алгоритма подразделения „Catmull-Clark“ скругляет края объекта, и это часто может быть не тем, что вам нужно. Существует несколько решений, которые позволяют вам контролировать подразделение.
Рёберные складки с назначенным весом
Рёберные складки с назначенным весом позволяют изменять способ, которым модификатор Subdivision Surface подразделяет геометрию. С их помощью краям можно придавать как плавный, так и острый вид.
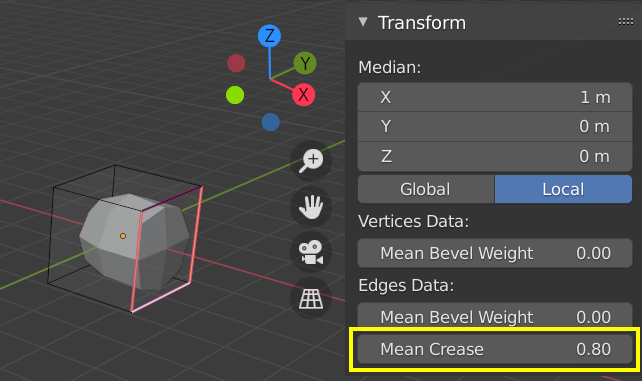
Подразделённый куб с назначенным весом складок на рёбрах.
Вес складок для выделенных рёбер можно изменять на панели „Transform“, боковой панели 3D-вьюпорта. Также можно использовать специальный инструмент в виде шкалы Shift-E для регулировки „веса складок“. Более высокое значение делает кромку «сильнее» и более устойчивой к сглаживающему эффекту подразделения поверхности.
Петли рёбер (edge loops)
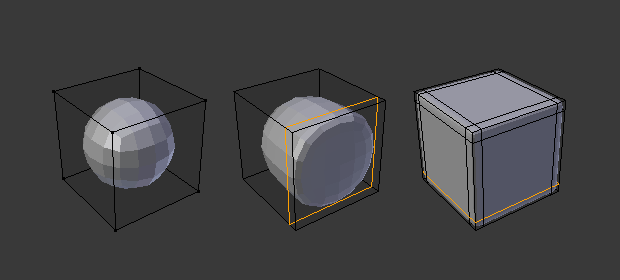
Куб со 2-ым уровнем подразделения, та же настройка с дополнительной рёберной петлей и с шестью дополнительными рёберными петлями.
Модификатор Subdivision Surface демонстрирует важность хорошей, чистой топологии. Как вы можете видеть на рисунке, он оказывает радикальное влияние на куб по умолчанию. Пока вы не добавите дополнительные петли (например, с помощью оператора „разрезания петлёй со сдвигом“), – форму куба в изменённой топологии узнать сложно.
Меш с продуманной топологией имеет хорошее размещение рёберных петель, что позволяет размещать больше петель (или удалять их) для управления резкостью/гладкостью результирующего меша.
Известные ограничения
Несмежные нормали
Резкие изменения нормалей не позволяют частям меша производить плавное подразделение. Вместо этого – эти части с несмежными нормалями будут подразделяться с использованием метода „Simple“.

Быстрый способ это исправить – „пересчитать“ нормали. Если это не сработает, вам, возможно, придётся „развернуть“ нормали вручную.