Zobrazenie záberu
Referencia
- Režim:
Režim objektu, pózy a editácie
- Panel:
Tento panel umožňuje prispôsobiť vzhľad kostí.
Zobrazenie panela záberu režime objektu/pózy.
Zobrazenie panela záberu v režime editácie.
Všeobecné
- Skryť
Skryje kosť v zobrazení 3D záberu. Keď je táto voľba zaškrtnutá, viditeľnosť kosti sa určuje podľa viditeľnosti jej kolekcie kostí.
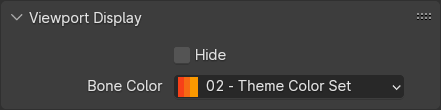
Farby kostí
Kosti môžu byť individuálne zafarbené. Môžete si vybrať sústavu farieb z preddefinovaného zoznamu motívov alebo definovať vlastnú.
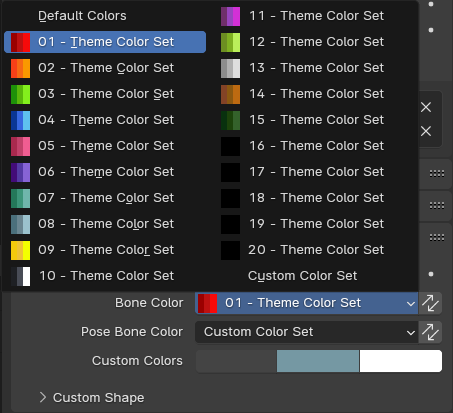
Keď vyberiete možnosť Vlastná sústava farieb, musíte definovať tri farby: Bežná (pre prípad, že kosť nie je vybraná), Vybraná a Aktívna.
Všetky priradenia farieb môžete dočasne vypnúť zrušením zaškrtnutia Farby kostí na paneli zobrazenia záberu armatúry.
- Farba kosti
Primárna farba kosti, ktorá ovplyvňuje režim editácie aj režim pózy.
Táto farba je uložená v bloku údajov armatúry, takže ak máte viac objektov armatúry, ktoré zdieľajú tento blok údajov, všetky budú používať rovnakú farbu.
- Kopírovať farbu kostí do vybranej
Skopíruje farbu aktívnej kosti do všetkých vybraných kostí.
- Farba kostí pózy režimu pózy
Umožňuje voliteľne prepísať vyššie uvedenú Farbu kostí v režime pózy (nastavením na inú hodnotu ako Predvolené farby).
Táto farba je uložená v kosti pózy, čo znamená, že môže byť odlišná v každom objekte armatúry - dokonca aj v tých, ktoré odkazujú na rovnaký blok údajov.
- Kopírovať farbu kostí do vybranej
Skopíruje farbu aktívnej kosti do všetkých vybraných kostí.
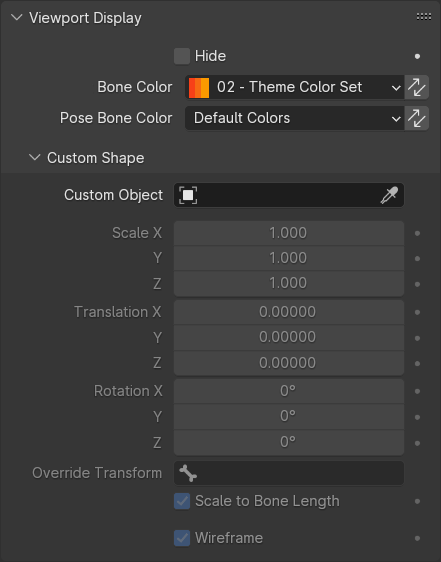
Vlastný tvar
Okrem vlastných farieb môžu mať kosti aj vlastné tvary (v režime objektu a režime pózy), pričom ako „šablónu“ môžete použiť iný objekt.
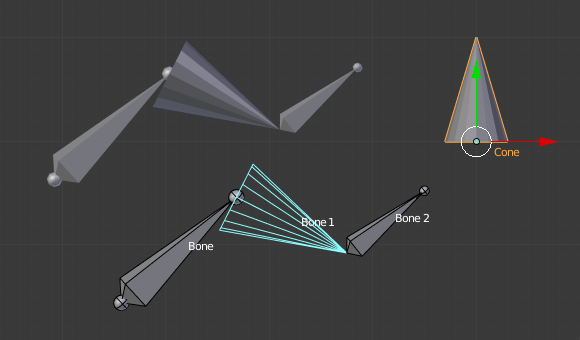
Kosť odkazujúca na kužeľ ako na svoj vlastný tvar.
Tieto tvary môžete dočasne vypnúť zrušením zaškrtnutia Tvary na paneli zobrazenia záberu armatúry.
- Vlastný objekt
Objekt, ktorý definuje vlastný tvar vybranej kosti.
- Mierka X, Y, Z
Prídavný faktor mierky, ktorý sa použije na vlastný tvar.
- Premiestnenie X, Y, Z
Prídavné premiestnenie na použitie vlastného tvaru.
- Rotácia X, Y, Z
Prídavná rotácia na použitie vlastného tvaru.
- Prepísať transformáciu
Kosť definujúca zobrazenie transformácie tohto vlastného tvaru.
- Mierka podľa dĺžky kosti
Určuje, či má byť vlastný tvar zmenšený koeficientom rovnajúcim sa dĺžke kosti.
- Drôtený rám
Ak je povolené, kosť sa zobrazí v režime drôteného rámu bez ohľadu na režim tieňovania na obrazovke.
- Šírka drôtu
Hrúbka čiary drôteného rámu pre vlastný tvar.
Poznámka
Vlastné tvary nebudú nikdy prekreslené. Rovnako ako bežné kosti sú viditeľné len v 3D zábere.
Transformácie objektu šablóny sa ignorujú. Jeho premiestnenie, rotácia alebo zmena mierky nebudú mať žiadny vplyv na jeho vzhľad v armatúre.
Počiatok každej vytvorenej inštancie objektu tvaru je v koreni kosti.
Rotácia každého tvarového objektu je taká, že jeho os Y leží v smere kosti.
Pre dosiahnutie najlepších výsledkov, keď je povolená funkcia Mierka podľa dĺžky kosti, sa uistite, že objekt šablóny má veľkosť 1 jednotky pozdĺž osi Y. Vďaka tomu bude dokonale zodpovedať veľkosti každej kosti.