Вступ
Анімування за допомогою Нарисного Олівця – Animating with Grease Pencil
The main goal of Grease Pencil is to offer a 2D animation tool full immersed in a 3D environment.
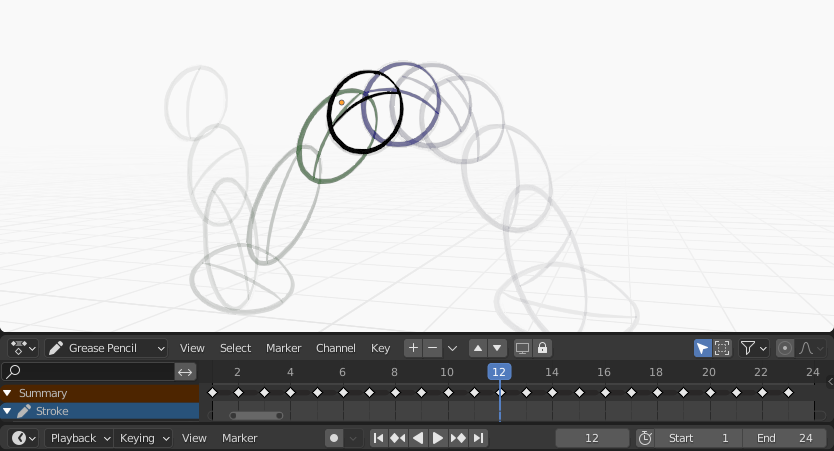
Sample animation showing Grease Pencil object keyframes in the Dope Sheet with onion skinning enabled.
In Blender, Grease Pencil objects can be animated in many ways:
- Руханням об’єкта, як цілого
Змінювання їх позицій, орієнтацій або розмірів у часі;
- Рисування кадр за кадром
Рисування одного кадру за раз (традиційна анімація).
- Деформуванням їх
Анімування їх точок;
- Успадкуванням анімації
Спричинення рухання об’єкта на основі переміщення іншого об’єкта (наприклад, його предка, гачка, арматури тощо…). Useful for cut-out animation for example.
Для повного огляду анімації у Blender’і, будь ласка, зверніться у главу Animation & Rigging.
Традиційна 2D Анімація – 2D Traditional Animation
Keyframes – Ключкадри
Traditional animation in Grease Pencil is achieved with the use of keyframes that hold the strokes information at a particular frame or frame range.
With Auto keyframe activated, every time you create a stroke in Grease Pencil object Draw Mode a new keyframe is added at the current frame on the active channel. With Auto keyframe deactivated, you will have to add manually a new keyframe or your new strokes will be added on the active keyframe.
See Keyframe Editing for more information.
Примітка
The channels in the Dope Sheet correspond to the active 2D layer of the Grease Pencil object.
Grease Pencil has its own mode in the Dope Sheet to work with keyframes. See Grease Pencil mode in the Dope Sheet section for more information. There are also several tools on the Stroke menu to work with keyframes and strokes. See Animation tools for more information.
Покривання Калькою – Onion Skinning
One key element in traditional animation is the use of onion skinning. Grease Pencil offers a lot of flexibility and options for this tool. See Onion Skinning for more information.
Опції Анімації – Animation Options
Режим Рисування – Draw Mode
In Draw Mode there are three options related to the animation workflow that you can use.

Загальні опції рисування/анімації.
- Додати Дані Вагомостей – Add Weight Data
When enabled, new strokes weight data is added according to the current vertex group and weights. If there is no vertex group selected, no weight data is added.
Це корисно, наприклад, у вирізній анімації для додання нового рисування на тій же самій групі вершин без потреби створення його згодом.
Дивіться детальніше Weight Paint Mode.
- Доповняльне Рисування – Additive Drawing
При створенні нових кадрів штрих з попереднього/активного кадру включаються як базис для нового.
- Багатокадр – Multiframe
If you need to add new strokes to your animation on several frames you can use multiframe drawing.
You can activate multiframe drawing with the Multiframe button next to the modes selector (faded lines icon). See Multiframe for more information.
Режим Редагування
In Edit Mode there is an option related to the animation workflow that you can use.

Multiframe editing.
- Багатокадр – Multiframe
Інколи вам можливо знадобиться модифікувати кілька кадрів одночасно за допомогою засобів редагування, наприклад, для перепозиціювання рисунків в анімації.
You can activate multiframe editing with the Multiframe button next to the modes selector (faded lines icon). See Multiframe for more information.
Examples – Приклади
Традиційна Анімація – Traditional Animation
This example shows you how to animate a bouncing ball with a traditional 2D animation technique and Grease Pencil.
First, go to menu to start with a new 2D animation template. The template is ready to quick start your animation with a Grease Pencil object already created, Onion Skinning activated, Auto Keyframe enabled and in camera view.
Задайте діапазон анімації у Часолінії – Timeline від 1 до 24.
In the 3D Viewport draw a ball on the upper left corner with the Draw Tool (extreme).
Перейдіть на кадр 12 та нарисуйте стиснутий м’яч у центі внизу (розбивка).
Move to frame 24 and draw a ball in the top right corner of the 3D Viewport (extreme).
Keep drawing all the in-between frames you want using the onion skinning ghost as a reference.
Для тестування анімації натисніть Spacebar для грання.