Вступ
A UV texture is a picture (image, sequence or movie) that is used to color the surface of a mesh. The UV texture is mapped to the mesh through one or more UV maps. There are three ways to establish the image used by the UV texture:
Use any image editing program to create an image. In the Image Editor, select the UV texture and load the image. Blender will then use that texture’s UV map to transfer the colors to the faces of the mesh.
Малювання плоского зображення у Редакторі Зображень – Image Editor на поточно вибраній текстурі UV, використовуючи її розкладку UV для переносу кольорів на грані сіті.
Paint the mesh in the 3D Viewport, and let Blender use the currently selected UV map to update the UV texture (as discussed below).
Blender features a built-in paint mode called Texture Paint which is designed specifically to help you edit your UV textures and images quickly and easily in either the Image Editor or the 3D Viewport. Since a UV texture is just a special-purpose image, you can also use any external paint program, like GIMP or Krita.
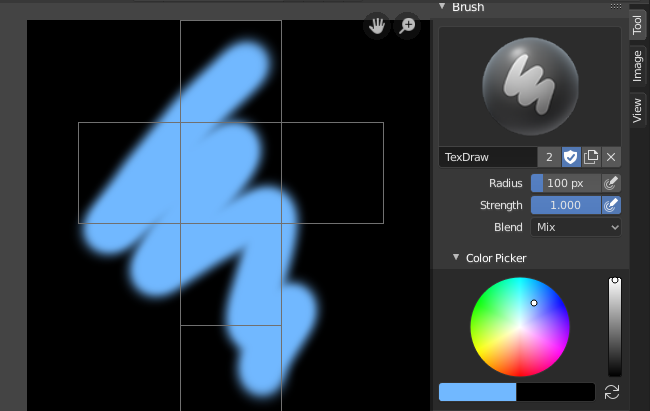
Малювання текстури у Blender.
Since a mesh can have layers of UV textures, there may be many images that color the mesh. However, each UV texture only has one image.
Texture Paint works in both a 3D Viewport and the Image Editor. In the 3D Viewport in Texture Paint Mode, you paint directly on the mesh by projecting onto the UVs.
Порада
Оптимізація Пам’яті – Memory Optimization
Texture Paint є швидким та чутливим при роботі в 3D Viewport та коли ваше зображення є за розміром квадратом, довжини сторін якого є степенем числа два, наприклад 256×256, 512×512, 1024×1024 тощо.
Getting Started – Почин
The object to be painted on must first be unwrapped. UVs can be added traditionally, with standard Unwrapping Tools, or by adding Simple UVs in Texture Paint mode.
Примітка
Коли жоден з шарів UV не може бути виявлено, то Blender покаже попереджувальне повідомлення.
Once you have unwrapped your model to a UV map, you can begin the texturing process. To use texture paint you may do any of the following:
Activate the Texture Paint workspace. Here the 3D Viewport has the Texture Paint Mode enabled and the Image Editor is already switched to Paint mode.
In the 3D Viewport, select Texture Paint Mode from the mode selector in the header, and you can paint directly onto the mesh.
In the Image Editor, switch the mode to Paint (shown in the image to the right).
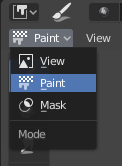
Вмикання режиму Paint.
Once you enable Texture Painting, your mouse becomes a brush. As soon as you enable Texture Painting or switch to Texture Paint Mode, different tools become available in the Toolbar.
In the Image Editor, you paint on a flat canvas that is wrapped around the mesh using UV coordinates. Any changes made in the Image Editor show up immediately in the 3D Viewport, and vice versa.
To work with the UV layout (for example, to move coordinates) you must use the UV Editor – Редактор UV.
A full complement of brushes and colors can be selected from the Sidebar region in the Image Editor. Brush changes made in either panel are immediately reflected in the other panel. However, the modified texture will not be saved automatically; you must explicitly do so with Save Image.
Передогляд Текстури – Texture Preview
Якщо ваша текстура веж використовується для розкладок кольорів, вигинів, зміщень, альфа-прозорості тощо, на поверхні моделі у вашій сцені (іншими технічними словами, є розкладеною по певних аспектах текстури через канал текстури, використовуючи UV як розкладку уводу), то ви можете бачити ефекти від вашого малювання у контексті вашої сцени під час того, як ви малюєте.
To do this, set up side-by-side areas, one Area in 3D Viewport set to Texture shading option, and in the second Area the Image Editor loaded with your image. Position the 3D Viewport to show the object that is UV-mapped to the loaded image. In the image to the right, the texture being painted is mapped to the «Normal» attribute, and is called «bump mapping», where the grayscale image is used to make the flat surface appear bumpy. See Texture Mapping Output for more information on bump mapping.
Збереження – Saving
If the header menu item Image has an asterisk next to it means that the image has been changed, but not saved. Use Save Image or Save Image As to save your work with a different name or overwrite the original image.
Примітка
Текстури UV – UV Textures
Оскільки, зображення використовувані як текстури UV функціонально відрізняються від інших зображень, то ви повинні зберігати їх в іншому каталозі, окремо від інших зображень.
The image format for saving is independent of the format for rendering.
The format for saving a UV image is selected in the header of the File Browser,
and defaults to PNG (.png).
If Packing is enabled in the File Browser’s header, or if you manually pack, saving your images to a separate file is not necessary.
Використання Зовнішнього Редактора Зображень – Using an External Image Editor
Якщо ви використовуєте зовнішню програму для редагування вашої текстури UV, ви повинні:
Запустити таку програму малювання (GIMP, Krita тощо).
Завантажити зображення або створити нове.
Модифікувати це зображення.
Зберегти зміни у межах тієї програми.
Повернутися у Blender та перезавантажити це зображення у Редакторі Зображень – Image Editor.
Ви схочете використовувати зовнішню програму, якщо ви маєте команди людей, що використовують різні програми для розроблення текстур UV, або якщо ви хочете застосувати якість спеціальні ефекти, які наразі немає функція Малювання Текстур, або якщо ви більш знайомі з іншою вашою улюбленою програмою малювання.
Відомі Обмеження
Перекриття UV – UV Overlap
Загалом, перекривні UVи не підтримуються (як і для запікання текстур).
Проте, це тільки проблема тоді, коли одиничний штрих пензля малюється на одночасно кількох гранях, що мають спільну текстуру.
Огляд Перспективи та Грані Позаду Огляду – Perspective View & Faces Behind the View
When painting onto a face which is partially behind the view (in perspective mode), the face cannot be painted on. To avoid this, zoom out or use an orthographic viewport.
Огляд Перспективи та Низько Полігональні поверхні – Perspective View & Low Poly
When painting onto a face in perspective mode onto a low-poly object with normals pointing away from the view, painting may fail; to workaround disable the Normal Falloff option in the stroke settings.
Typically this happens when painting onto the side of a cube (see Blender bug #34665).