Устави Пензля – Brush Settings
Each mode and brush has unique brush settings. But there is also a lot of overlap or similar settings. This page explains general and mode specific settings that are used across various brushes in more detail.
Changes to the settings of a brush asset are temporary and will be discarded when Blender is closed. To preserve settings, save them to the currently active brush asset using Save Changes to Asset, or create a new brush asset using Duplicate Asset, see Asset Operators. Loading a different file while Blender remains open does not discard the settings.
Unified Settings
Some settings (e.g. size, strength, color), indicated with , allow for using a per-mode setting instead of the individual brush setting. These settings are shared across all brushes of a given mode (e.g. Sculpt Mode) but do not overwrite the individual brush value.
General – Загальне
- Розмір
This option controls the size of the brush, measured in pixels. F allows you to change the brush size interactively by dragging the mouse from left to right and then LMB to accept. Meanwhile the texture of the brush will be visible inside the circle. You can also enter the size numerically with the number keys.
The size can be decreased/increased using [ and ] respectively.
- (Size Pressure)
Adjusts the size based on the stylus pressure when using a Graphics Tablet.
- (Use Unified Size)
Use the same brush Size across all brushes.
- / (Expand/Collapse)
Show or hide the customizable pressure curve.
- Кастомна Крива – Custom Curve
By default this is a straight line with positive slope such that increased pressure results in a larger brush size.
Про керувальники кривої дивіться: Curve widget.
- Size Unit Sculpt Mode
Controls how the brush Size is measured.
- Огляд:
The Size is measured based on how the cursor appears on the monitor i.e. «screen space».
- Сцена:
The Size is measured based on real world units. This means that the brush size stays consistent, independently from zooming in and out in the viewport. The unit type and scaling can be configured in the Scene Units.
- Strength – Сила
For painting brushes the Strength defines the maximum effect of each brush stroke. For example, higher values cause a Paint brush to give each stroke a higher opacity. The opacity is never stronger than the set Strength, no matter how often the same surface is painted during the same stroke.
For sculpting brushes on the other hand the Strength relates to how strong each step of the stroke is, resulting in a slower/faster buildup towards the full brush effect during the stroke.
You can change the brush strength interactively by pressing Shift-F and then moving the brush and then LMB. You can also enter the strength numerically with the number keys.
- (Strength Pressure)
Adjusts the strength based on the stylus pressure when using a Graphics Tablet.
- (Use Unified Strength)
Використовується однакова сила Strength пензля по всіх пензлях.
- / (Expand/Collapse)
Show or hide the customizable pressure curve.
- Кастомна Крива – Custom Curve
By default this is a straight line with positive slope such that increased pressure results in a stronger brush deformation.
Про керувальники кривої дивіться: Curve widget.
- Змішати
Set the way the color or value is applied over the targeted Color Attribute, Vertex Group or Image Texture. See Color Blend Modes.
Додання Альфа – Add Alpha: робить зображень більш безпрозорим при малюванні.
Erase Alpha: makes the image transparent where painted, allowing background colors and lower-level textures to show through. As you «paint», the false checkerboard background will be revealed. Using a tablet pen’s eraser end will toggle on this mode.
Порада
In order to see the effects of the Erase and Add Alpha mix modes in the Image Editor, the Display Channels must be set to Color & Alpha or Alpha. Transparent (no alpha) areas will then show a checkered background.
- Weight Weight Paint
The weight value that is applied to the vertex group.
Use Shift-X to sample the weight value of clicked vertex. Shift-Ctrl-X lets you select the group from which to sample from.
- Direction Ctrl Sculpt Mode
Brush direction toggle, Add raises geometry towards the brush, Subtract lowers geometry away from the brush. This setting can be toggled with Ctrl while sculpting.
- Normal Radius Sculpt Mode
Determines the ratio of how much the brush radius is used to sample the normal direction of the sculpt plane of the brush. For example, a smaller Normal Radius will lead to drastic changes in the brush orientation, like for following the contours of hard surface meshes more closely. A large Normal Radius will lead to smoother changes in orientation, like for building overall forms on organic sculptures.
- Радіус Області – Area Radius
The ratio between the brush radius and the radius that is going to be used to sample the area plane depth.
- Tilt Strength Sculpt Mode
Determines how much the tilt of the user’s tablet pen affects the brush normal. Negative values correspond to inverting the direction of the tilt.
- Hardness Sculpt Mode
Як близько спад пензля починається від краю пензля.
- Округлість Верхівки – Tip Roundness
The factor to control how round the brush is. A value of zero will make the brush square. Note, the Brush Falloff is only applied to the rounded portions of the brush.
- Auto-smooth Sculpt Mode
Задає величину згладження, що застосовується до кожного штриха.
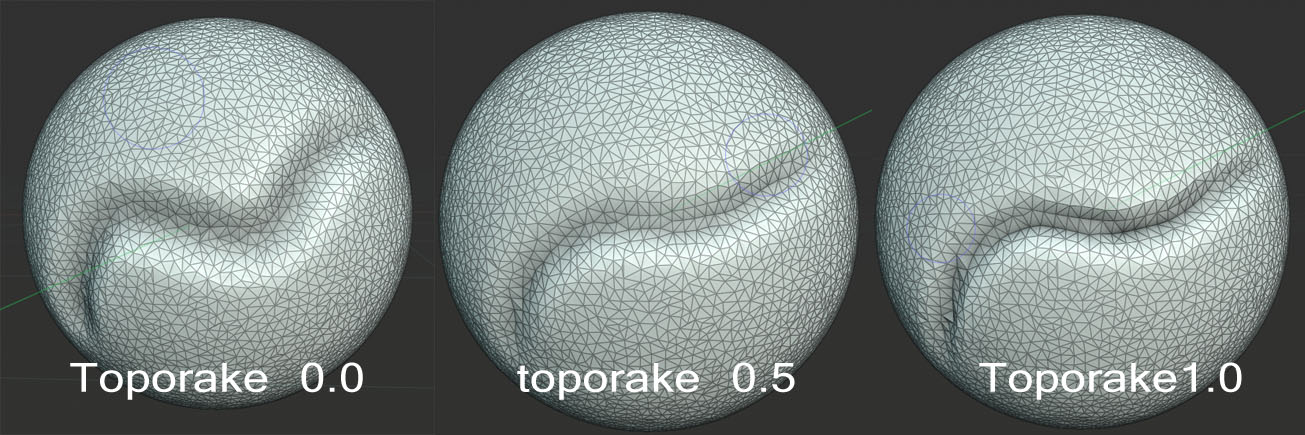
- Topology Rake Sculpt Mode
The higher this setting is set, the more Dyntopo aligns mesh edges to the brush direction while tessellating the surface. This generates cleaner edge flow to help define sharp features. Topology Rake can have a severe performance impact so it works best on low-poly meshes.
- Normal Weight Ctrl Sculpt Mode
Constrains brush movement along the surface normal. Especially useful with the Grab brush, can be temporarily enabled by holding Ctrl. E.g. Grab brush can be used to push a depression (hole) into the mesh when Normal Weight is set.
Застосовується з пензлями Grab та Snake Hook.
- Plane Offset Sculpt Mode
Зсув для площинних пензлів (Clay, Fill, Flatten, Scrape), зсуває площину, що знаходиться за усереднюванням граней вище або нижче.
- Plane Trim Sculpt Mode
Ability to limit the distance that planar brushes act. If trim is enabled vertices that are further away from the offset plane than the trim distance are ignored during sculpting.
- Pinch/Magnify Sculpt Mode
Pushes the mesh towards/away from the brush center during the stroke.
- Deformation Target
How the deformation of the brush will affect the object.
- Геометрія:
Deform the geometry directly.
- Cloth Simulation:
Deform the mesh while a cloth simulation is applied to it at the same time.
Advanced – Просунуто
- Brush Type
Defines the basic behavior and the available settings. Through the settings of a brush type, brushes can be created that produce vastly different effects.
The Essentials asset library contains brushes for each of the brush types. Their preview image and description should give a good idea of the effect the brush produces, with the particular combination of brush type and settings. Because of this, they are usually the more useful starting point for custom brushes than the mere brush type is, which is why the brush type is part of the Advanced brush settings.
Brushes and Brush Types of each mode:
- Affect Alpha 2D Painting Only
When this is disabled, it prevents changes to the alpha channel while painting (Only in 3D Viewport).
- Загладжування – Anti-Aliasing 2D Painting Only
Toggles Anti-Aliasing around the brush, this is useful if you are working with pixel art or low resolution textures.
- Accumulate – Накопичення
Спричиняє, що мазки штриха накопичуються один поверх іншого.
- Лише Передні Грані – Front Faces Only
При увімкненні пензель впливатиме тільки на вершини, що перед користувачем.
- Sculpt Plane Sculpt Mode
Use this menu to set the plane in which the sculpting takes place. In other words, the primary direction that the vertices will move.
- Площина Області – Area Plane:
The movement takes place in the direction of average normal for all active vertices within the brush area. Essentially, this means that the direction is dependent on the surface beneath the brush.
- Площина Огляду – View Plane:
Ліплення у площині поточного 3D Viewport.
- Площина X, Y, Z – X, Y, Z Plane:
Переміщення відбувається у додатному напрямку однієї з глобальних осей.
- Original – Normal Sculpt Mode
При блокуванні це продовжує використовування нормалі поверхні, де штрих було почато, замість нормалі поверхні, що є поточно під курсором.
- Original – Plane Sculpt Mode
При увімкненні продовжується використовування площини початку поверхні, де штрих було ініційовано, замість площини поверхні, поточної під курсором.
Auto-Masking
Sculpt Mode
The auto-masking toggles in the brush settings are the same as the sculpt mode auto-masking settings. The difference is that these toggles can be customized per brush to create specific brush behaviors.
Дивись також
For more information on the Auto-Masking toggles, see Auto-Masking.
Підбирач Кольору – Color Picker
Колір
Brushes have two colors that can be set using the Підбирач Кольору – Color Picker:
Primary Color: The active color used for painting by default.
Secondary Color: An alternate color that can be quickly accessed.
By default, painting uses the primary color. The secondary color can be used temporarily by holding Ctrl while painting. The two colors can also be swapped at any time using Swap Colors.
Порада
Press Shift-X to sample a color at the mouse cursor position.
Press Shift-Ctrl-X to sample the merged viewport color, including lighting, shading, and all visible layers.
The sampled color becomes the primary color of the active Paint brush.
- (Swap Colors) X
Обмінює первинний та вторинний кольори.
- (Use Unified Color)
Використовується однаковий колір для всіх пензлів.
Примітка
Зауважте, що Малювання Вершин працює у просторі – space sRGB, і представлення RGB тих самих кольорів буде відрізнятися між засобами малювання та матеріалами, що є у лінеарному – linear просторі.
Градієнт – Gradient
Градієнт може використовуватися як джерело кольору.
- Кольори Градієнта – Gradient Colors
Віджет градієнта кольорів – Віджет Градієнта Кольорів – Color Ramp Widget для визначення кольорів градієнта.
- Режим
- Натиск – Pressure:
Буде обиратися колір з градієнта кольорів відповідно до натиску стилуса.
- Clamp – Затиск:
Will alter the color along the stroke and as specified by Gradient Spacing option. With Clamp it uses the last color of the color ramp after the specified gradient.
- Repeat – Повтор:
Similar to Clamp. After the last color it resets the color to the first color in the color ramp and repeats the pattern.
Randomize Color
Applies random variation to the brush color for more natural and varied strokes. Useful for hand-painting textures or adding subtle irregularities.
The randomness can affect hue, saturation, and value independently. Each channel also supports pressure sensitivity and stroke-based randomness.
- Hue – Відтінок
Amount of random variation applied to the hue of the brush color.
- (Stroke Random)
Apply a single random hue per stroke instead of varying continuously during the stroke.
- (Use Pressure)
Modulate hue variation based on pen pressure.
- Saturation – Насиченість
Amount of random variation applied to the saturation of the brush color.
- (Stroke Random)
Apply a single random saturation per stroke instead of varying continuously during the stroke.
- (Use Pressure)
Modulate saturation variation based on pen pressure.
- Value – Значення
Amount of random variation applied to the value (brightness) of the brush color.
- (Stroke Random)
Apply a single random value per stroke instead of varying continuously during the stroke.
- (Use Pressure)
Modulate value variation based on pen pressure.
Color Palette – Палітра Кольорів
Color Palettes are a way of storing a brush’s color so that it can be used at a later time. This is useful when working with several colors at once.
- Палітра – Palette
Меню Меню Блоку Даних – Data-Block Menu для вибору палітри.
- (New Palette Color)
Додає первинний колір Color поточного пензля у палітру.
- (Delete Palette Color)
Вилучає поточно вибраний колір з палітри.
- / (Move Palette Color)
Переміщує вибраний колір уверх/вниз на одну позицію.
- (Sort By)
Сортувати Кольори за Відтінком, Насиченістю, Значенням, Світністю – Sort Colors by Hue, Saturation, Value, Luminance.
- Список Кольорів – Color List
Each color that belongs to the palette is presented in a list. Clicking on a color will change the brush’s primary Color to that color.