Editing Weight Paint
Посилання
- Режим:
Режимом Редагування та Режим Малювання Вагомостей – Edit Mode and Weight Paint Mode
- Меню:
«Вагомості» –
Засоби Малювання Вагомостей.
Blender передбачає набір допоміжних засобів для Малювання Вагомостей.
Опція «Підмножина» – Subset
Some of the tools also provide a Subset filter to restrict their functionality to only specific vertex groups (in the Наладнати Останню Операцію – Adjust Last Operation panel, displayed after the tool is called) with following options:
Активна Група – Active Group
Вибрані Кістки Поз – Selected Pose Bones
Деформувальні Кістки Поз – Deform pose Bones
Усі групи – All Groups
All tools also work with Vertex Selection Masking and Face Selection Masking. In these modes the tools operate only on selected vertices or faces.
Призначити з Оболонок Кісток – Assign from Bone Envelopes
Застосовується вагомість оболонки вибраних кістки(ок) до обраної групи вершин.
Призначити Автоматично з Кісток – Assign Automatic from Bones
Застосовуються з вибраних кістки(ок) до групи вершин ті ж методи «авто-виваження» – «auto-weighting», що доступні у меню приріднення Parent до арматури.
Нормалізувати Усе – Normalize All
For each vertex, this tool makes sure that the sum of the weights across all vertex groups is equal to 1. This tool normalizes all of the vertex groups, except for locked groups, which keep their weight values untouched.
- Блокувати Активне – Lock Active
Зберігається значення вагомостей активної групи без змін та одночасно нормалізуються усі інші групи вершин.
Normalize – Нормалізування
This tool only works on the active vertex group. All vertices keep their relative weights, but the entire set of weights is scaled up such that the highest weight value is 1.0.
Приклад нормалізування.
Mirror – Дзеркалення
The Mirror Vertex Group tool mirrors the weights from one side of a perfectly symmetrical mesh to the opposite side. Those vertices that have no corresponding vertex on the other side will not be affected. But note, the weights are not transferred to the corresponding opposite bone weight group.
Примітка
Mirroring only works when the object’s rest pose is perfectly symmetrical across the X axis.
Приклад дзеркалення.
- Дзеркалити Вагомості – Mirror Weights
With this option checked, every selected vertex receives the weight information of its symmetrical counterpart. If both vertices are selected, it will be a weight information exchange; if only one is selected, information from the unselected will overwrite the selected one. Information on weight is passed for the active group only, unless All Groups is checked, in which case it is passed for all groups.
- Переверт Імен Груп – Flip Group Names
Works with selected vertices that belong to vertex groups with «symmetrical names» (with components like «L», «R», «right», «left»). All selected vertices that belong to the active group, or to the symmetrical of the active group, will have their assignation to that group replaced by an assignation to the symmetrical one; however, its weight will be preserved. If All Groups is checked, all assignations to these kind of groups will be replaced by the symmetrical counterpart, also keeping the old weights.
- Усі групи – All Groups
Працює для усіх груп вершин, замість лише активної.
- Топологічне Дзеркалення – Topology Mirror
Mirror for meshes which are not fully symmetric (approximate mirror). See here for more information.
Порада
Дзеркалення на Протилежну Кістку
Якщо ви хочете створити дзеркальну групу вагомостей для протилежної кістки (симетричного персонажа), то ви можете зробити наступне:
Видаліть цільову групу вершин (де дзеркалені вагомості будуть поміщатися).
Створіть копію джерельної групи вершин кістки (група, що містить вагомості, які ви хочете копіювати).
Перейменуйте нову групу вершин на ім’я цільової групи вершин (група, що ви перед цим видалили).
Select the target vertex group and call the Mirror tool (use only Mirror Weights and optionally Topology Mirror if your mesh is not symmetric).
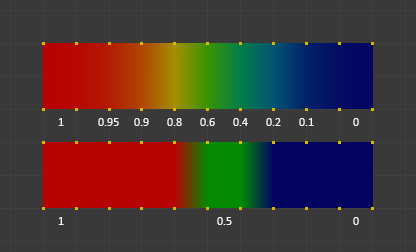
Invert – Інверт
Замінює кожну Вагомість обраної групи вагомостей на значення × -1.0.
Приклади:
Оригінал 1.0 конвертується у 0.0
Оригінал 0.5 залишається 0.5
Оригінал 0.0 конвертується в 1.0
Інвертування вагомостей.
- Підмножина – Subset
Restrict the tool to a subset. See above The Subset Option about how subsets are defined.
- Додати Вагомості – Add Weights
Додає вершини, що не мають жодної вагомості перед інвертуванням (ці вагомості будуть усі задані як 1.0).
- Вилучити Вагомості – Remove Weights
Вилучає вершини з групи вершин, якщо вони мають вагомість 0.0 після інвертування.
Примітка
Не впливає на блоковані групи вершин.
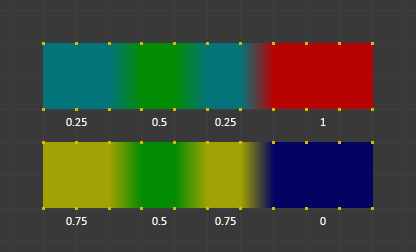
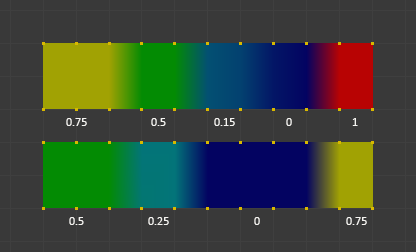
Очищення – Clean
Clean Vertex Group Weights unassigns vertices from Vertex Groups whose weights are below the Limit. Removes weights below a given threshold. This tool is useful for clearing your weight groups of very low (or zero) weights.
У прикладі, що показується, використовується відрізне значення 0.2 (дивіться опції оператора нижче), так що усі сині частини очищаються.
Зауважте, що для цієї ілюстрації активна опція Show Zero Weights, яка дає забарвлення вагомостей незадіяних вершин чорним кольором.

Приклад очищення.
- Підмножина – Subset
Restrict the tool to a subset. See above The Subset Option for how subsets are defined.
- Ліміт
This is the minimum weight value that will be kept in the group. Weights below this value will be removed from the group.
- Утримати Одиничне – Keep Single
Гарантує, що засіб Clean не буде створювати повністю незадіяні вершини (вершини. що не призначені у жодну групу вершин), а тому кожна вершина буде зберігати принаймні одну вагомість, навіть якщо її значення менше цього ліміту!
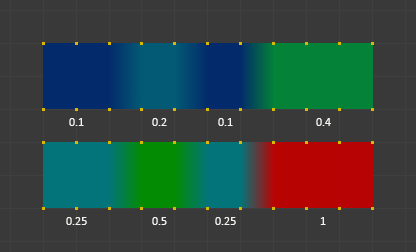
Квантування – Quantize
Цей оператор використовує процес, відомий як квантування – Quantization, який бере увідні вагомості та затискає кожну вагомість кількістю кроків між (0 - 1) так, що там більше немає плавного градієнта між значеннями.
Приклад квантування (Steps = 2).
- Steps – Кроки
The number of steps between 0 and 1 to quantize the weights into. For example 5 would allow the following weights
[0.0, 0.2, 0.4, 0.6, 0.8, 1.0].
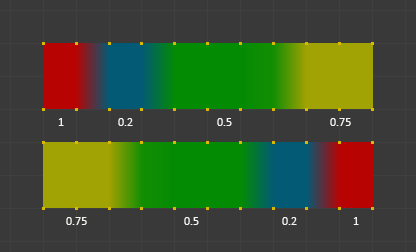
Рівні – Levels
Adds an offset and a scale to all weights of the selected weight groups. with this tool you can raise or lower the overall «heat» of the weight group.
Примітка
Жодна вагомість не буде задана вище 1.0 та нижче 0.0, незалежно від цих устав.
Приклад Levels.
- Підмножина – Subset
Restrict the tool to a subset. See above The Subset Option for how subsets are defined.
- Offset – Зсув
Значення з діапазону (-1.0 - 1.0), що буде додане до усіх вагомостей у групі вершин.
- Gain – Підсил
Усі вагомості у Підмножині множаться на це підсилення.
Примітка
Whichever Gain and Offset you choose, in all cases the final value of each weight will be clamped to the range (0.0 - 1.0). So you will never get negative weights or overheated areas (weight > 1.0) with this tool.
Smooth – Згладження
The Smooth operator blends the weights of selected vertices based on the average of adjacent vertices, creating smoother transitions in weight painting. This operator is useful for refining weight distributions, improving deformation in rigging, and eliminating abrupt transitions between vertex weights.
Примітка
This operator requires vertex selection to be enabled; otherwise, it will be unavailable.
- Підмножина – Subset
Restrict the tool to a subset. See above The Subset Option about how subsets are defined.
- Factor – Фактор
Controls the amount of blending toward the average weight of connected vertices.
A Factor of 0.0 preserves the original weights.
A Factor of 1.0 fully adopts the calculated average weight.
Values between 0.0 and 1.0 blend the weights proportionally.
- Iterations – Ітерації
Sets how many times the smoothing operation is repeated. Higher values produce smoother results but may introduce unwanted artifacts in fine details.
- Розгортання/Згортання – Expand/Contract
Adjusts the smoothing influence by expanding or contracting the selection:
Positive values expand the selection to include neighboring vertices.
Negative values contract the selection to focus on a smaller subset of vertices.
Examples – Приклади
Example: Single Selected Vertex
Consider a single selected vertex connected to four unselected vertices. The unselected vertices have weights: 1, 0, 0, and 0. The average weight of the unselected vertices is: \((1 + 0 + 0 + 0) / 4 = 0.25\)
If the Factor is:
0.0: The selected vertex retains its original weight.
1.0: The selected vertex adopts the calculated average weight (0.25).
Between 0 and 1: The vertex’s weight gradually shifts toward 0.25, blending proportionally.

Single vertex select with a Factor of 1.0.
Example: Multiple Selected Vertices
When multiple vertices are selected, the Smooth operator applies calculations to each vertex based on its adjacent unselected vertices.
Наприклад:
A vertex connected to three unselected vertices with weights \((1, 0, 0)\) averages to \(0.333\).
A vertex connected to one unselected vertex with weight 1 averages to \(1.0\).
A vertex connected only to unselected vertices with weights \((0, 0, 0)\) remains unchanged with an average weight of \(0.0\).
These blended results depend on the Factor value.

Three selected vertices with a Factor of 1.0.
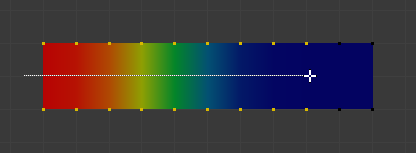
Example: Edge Loop Smoothing
In a practical use case, selecting a middle edge loop allows the operator to blend weights between adjacent areas. For example:
The edge loop has two unselected adjacent vertices on either side, with weights \(1\) and \(0\).
The average weight is \((1 + 0) / 2 = 0.5\).
Applying the Smooth operator with Factor set to 1.0 will turn the edge loop green, creating a smooth blend between the «hot» (left) and «cold» (right) sides.

Center edge loop of vertices selected with a Factor of 1.0.
Перенести Вагомості – Transfer Weights
Копіюються вагомості з інших об’єктів у групи вершин активного об’єкта.
By default this tool copies only the active (selected) vertex group of the source object to the active vertex group of target object or creates a new one if the group does not exist. However, you can change the tool’s behavior in the Наладнати Останню Операцію – Adjust Last Operation panel.
Наприклад, для перенесення усіх наявних груп вершин з джерельних об’єктів на цільовий змініть опцію для Source Layers Selection на By Name.
Примітка
This tool uses the generic «data transfer», but transfers from all selected objects to active one. Please refer to the Data Transfer docs for options details and explanations.
Підготовка Копіювання – Prepare the Copy
Спершу ви вибираєте усі джерельні об’єкти та останнім цільовий об’єкт (цільовий об’єкт повинен бути активним об’єктом).
It is important that the source objects and the target object are at the same location. If they are placed side-by-side, then the weight transfer will not work. (See the Vertex Mapping option.) You can place the objects on different layers, but you have to ensure that all objects are visible when you call the tool.
Now ensure that the target object is in Weight Paint Mode. Open the Toolbar and call the Transfer Weights tool in the Weight Tools panel.
Спантеличення з Панеллю «Наладнати Останню Операцію» – Adjust Last Operation Panel Confusion
You may notice that the Наладнати Останню Операцію – Adjust Last Operation panel stays available after the weight transfer is done. The panel only disappears when you call another Operator that has its own Наладнати Останню Операцію – Adjust Last Operation panel. This can lead to confusion when you use Transfer weights repeatedly after you changed your vertex groups. If you then use the still-visible Наладнати Останню Операцію – Adjust Last Operation panel, then Blender will reset your work to its state right before you initially called the Transfer Weights tool.
So when you want to call the Transfer Weights tool again after you made some changes to your vertex groups, then always use the Transfer Weights button, even if the Наладнати Останню Операцію – Adjust Last Operation panel is still available. Unless you really want to reset your changes to the initial call of the tool.
Ліміт Тотально – Limit Total
Reduce the number of weight groups per vertex to the specified Limit. The tool removes lowest weights first until the limit is reached.
Підказка
Даний засіб може працювати розумно тільки, коли вибрано більш ніж одна група вагомостей.
- Підмножина – Subset
Restrict the tool to a subset. See above The Subset Option for how subsets are defined.
- Ліміт
Максимальна кількість вагомостей, дозволена для кожної вершини.
Set Weight
Посилання
- Режим:
Weight Paint Mode
- Меню:
- Скорочення:
Ctrl-X
Fill the active vertex group with the current paint weight.
Sample Weight
Посилання
- Режим:
Weight Paint Mode
- Меню:
- Скорочення:
Shift-X
Adjust the Weight of the Draw tool to the weight of the vertex under the mouse cursor.
Sample Group
Посилання
- Режим:
Weight Paint Mode
- Меню:
- Скорочення:
Shift-Ctrl-X
Select one of the vertex groups available under current mouse position.
Gradient (Linear)
Посилання
- Режим:
Weight Paint Mode
- Меню:
- Скорочення:
Shift-A
Applies a linear weight gradient; this is useful at times when painting gradual changes in weight becomes difficult. Blends the weights of selected vertices with unselected vertices.
Приклад засобу Gradient, використаного при режимі маскування вибранням вершин.
- Вагомість
Градієнт стартує з поточно обраним значенням вагомості, не змішуючи нічого.
- Strength – Сила
Нижчі значення можуть використовуватися для змішування градієнта з наявними вагомостями (як і з пензлем).
- Тип
The shape of the gradient.
- Linear – Лінеарно:
Create gradient that forms a straight line.
- Радіально – Radial:
Create gradient that forms a circle.
Gradient (Radial)
Посилання
- Режим:
Weight Paint Mode
- Меню:
- Скорочення:
Shift-Alt-A
Applies a radial weight gradient; this is useful at times when painting gradual changes in weight becomes difficult. Blends the weights of selected vertices with unselected vertices.
- Вагомість
Градієнт стартує з поточно обраним значенням вагомості, не змішуючи нічого.
- Strength – Сила
Нижчі значення можуть використовуватися для змішування градієнта з наявними вагомостями (як і з пензлем).
- Тип
The shape of the gradient.
- Linear – Лінеарно:
Create gradient that forms a straight line.
- Радіально – Radial:
Create gradient that forms a circle.
Блокування – Locks
Посилання
- Режим:
Режимом Редагування та Режим Малювання Вагомостей – Edit Mode and Weight Paint Mode
- Меню:
- Скорочення:
K
Групи вершин можуть блокуватися для запобігання небажаним редагуванням у певній групі вершин.
Порада
Кістки, що належать до блокованої групи вершин, показуються червоним у 3D Viewport.
- Блокувати Усе – Lock All
Блокує всі групи вершин.
- Блокувати Вибране – Lock Selected
Locks selected vertex groups.
- Блокувати Невибране – Lock Unselected
Блокує невибрані групи вершин.
- Блокувати Лише Вибране – Lock Only Selected
Блокуються вибрані та розблоковуються вибрані групи вершин.
- Блокувати Лише Невибране – Lock Only Unselected
Розблоковуються вибрані та блокуються невибрані групи вершин.
- Розблокувати Усе – Unlock All
Розблоковує всі групи вершин.
- Unlock Selected
Unlocks selected vertex groups.
- Розблокувати Невибране – Unlock Unselected
Розблоковує невибрані групи вершин.
- Інвертувати Блокування – Invert Locks
Inverts the locks on all vertex groups.