Selection & Visibility
Маскування Вибранням – Selection Masking
If you have a complex mesh, it is sometimes not easy to paint on the intended vertices. Suppose you only want to paint on a small area of the Mesh and keep the rest untouched. This is where «selection masking» comes into play. When this mode is enabled, a brush will only paint on the selected vertices or faces. The option is available from the header of the 3D Viewport (see icons surrounded by the yellow frame):

You can choose between Face Selection masking (left button), Vertex selection masking (middle button), and Bone selection (right button). The latter is only available when the mesh has an Armature modifier.
Маскування вибранням має деякі переваги над стандартним режимом малювання:
Ребра оригінальної сіті показуються, навіть коли модифікатори активні.
You can select and deselect faces instead without the need to switch to Edit Mode.
Подробиці Про Вибирання – Details About Selecting
Підтримуються наступні стандартні операції вибрання:
Alt-LMB – Single faces
Shift-Alt-LMB – Select more or remove them from the selection.
A – All faces, A A to deselect.
B – Вибрання Коробкою.
C – Вибрання Кругом за допомогою пензля.
Ctrl-I – Invert selection.
L – Підбір пов’язаного (під вказівником миші).
Ctrl-L – Вибір пов’язаного.
Ctrl-NumpadPlus – Extend Selection
Ctrl-NumpadMinus – Shrink Selection
Alt-LMB – Vertex Loop Select
Маскування Вибранням Вершин – Vertex Selection Masking
Посилання
- Режим:
Режими Малювання Вершин та Вагомостей – Vertex and Weight Paint Modes
- Заголовок:
«Вибрання Вершин» –
- Скорочення:
2
In this mode you can select one or more vertices and then paint only on the selection. All unselected vertices are protected from unintentional changes.
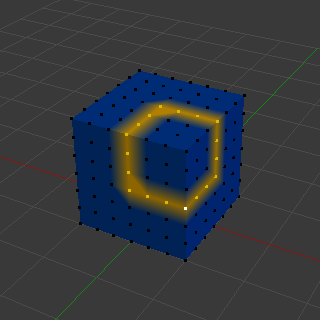
Маскування Вибранням Вершин.
Маскування Вибранням Граней – Face Selection Masking
Посилання
- Режим:
Режими Малювання Текстур, Вершин та Вагомостей – Texture, Vertex, and Weight Paint Modes
- Заголовок:
«Маска Малювання» –
- Скорочення:
1
The Face Selection Masking allows you to select faces and limit the paint tool to those faces, very similar to Vertex selection masking.
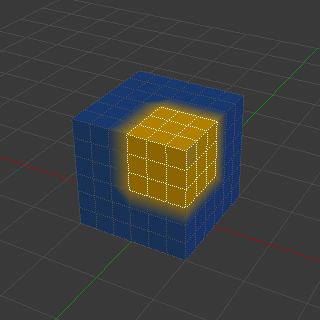
Маскування Вибранням Граней.
Ховання/Знеховання Граней – Hide/Unhide Faces
Посилання
- Режим:
Texture, Vertex Paint, and Weight Paint Modes
- Меню:
, ,
- Скорочення:
Alt-H, H, Shift-H
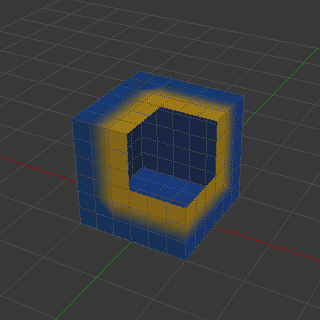
Сховані грані.
Faces can be temporarily hidden to limit painting to only the visible parts of the mesh. Hidden faces cannot be painted or selected until they are revealed again. This can be useful for isolating specific regions of a mesh while painting.
H – Hide the currently selected faces.
Shift-H – Hide all unselected faces, isolating the current selection.
Alt-H – Reveal all hidden faces.
Ховання/Знеховання Вершин – Hide/Unhide Vertices
You cannot specifically hide only selected faces in vertex mask selection mode. However, the selection is converted when switching selection modes. So a common trick is to:
Switch to Face selection mask mode to have the selection converted to faces.
Refine your selection next or just hide the faces.
Перемикнутися назад у режим маскування вибранням Вершин.
Hiding faces will make sure that vertices that belong to visible faces remain visible.
Регіон Відсікання – The Clipping Region
To constrain the paint area further you can use the Clipping Region. Press Alt-B and LMB-drag a rectangular area. The selected area will be «cut out» as the area of interest. The rest of the 3D Viewport gets hidden.
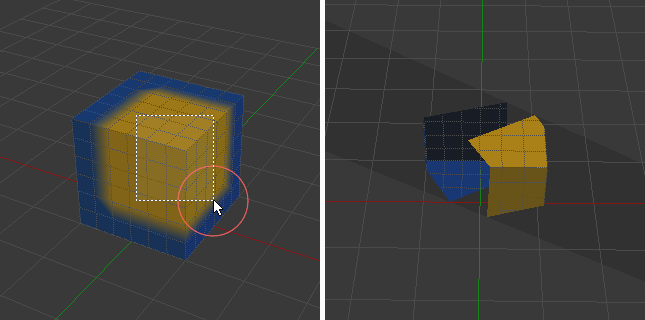
Регіон відсікання Clipping Region використовується для вибору потрібних частин для локального малювання.
Ви зможете зробити усю сіть видимою, натиснувши Alt-B другий раз.
Усі засоби малювання, що використовують цей огляд, працюють з цим відсіканням, включаючи вибір коробкою, та, звичайно, штрихи пензля.
There are two helpful reminders that a Clipping Region is used:
The clipping region is drawn as a gray box in the 3D Viewport
The Text Info overlay will state that the perspective is «Clipped»
Select Linked – Вибір Пов’язане
Посилання
- Режим:
Режим Редагування
- Меню:
- Скорочення:
Ctrl-L, Shift-L
Select geometry connected to already selected elements. This is often useful when a mesh has disconnected, overlapping parts, where isolating it any other way would be tedious. Pressing Shift-L will deselect linked any linked elements.
With L you can also select connected geometry directly under the cursor.