Creating Meta-rigs
Add a single bone from the menu.
Go in armature Edit Mode and build the meta rig by samples or Rigify-types.
Define the Rigify bone collection UI, color sets, and selection sets.
In the armature properties click on the Generate button to generate the rig.
How Rigify Works
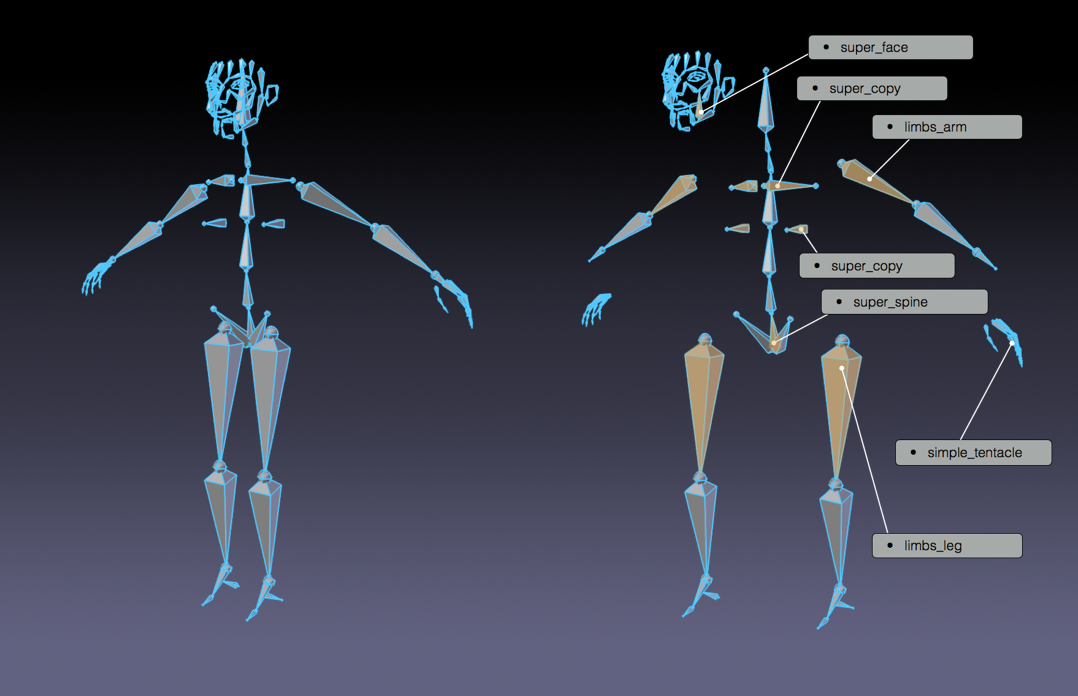
- Rigify Meta-Rigs are split in multiple Sub-Rigs
A meta-rig is an assembly of bone chains. A bone chain is identified by the Connected attribute. Bone chains can be further connected together by parenting them without using the Connected attribute (i.e. using the Keep Offset option while parenting).
- A custom attribute is set on the first bone of the sub-rig chain
Each first bone of a bone chain has a custom attribute on it which is a Rigify custom property that identifies the sub-rig type. At rig generation time Rigify will determine which controls and deform bones will be created processing the meta-rig from the first bone to the last of each chain.
Human meta-rig split by samples.
- New meta-rigs are created assembling sub-rigs samples
Since a meta-rig is just a collection of sub-rigs, new meta-rigs can be built assembling sub-rigs in different ways. This way an infinite number of meta-rigs can be built from the same rigging blocks.
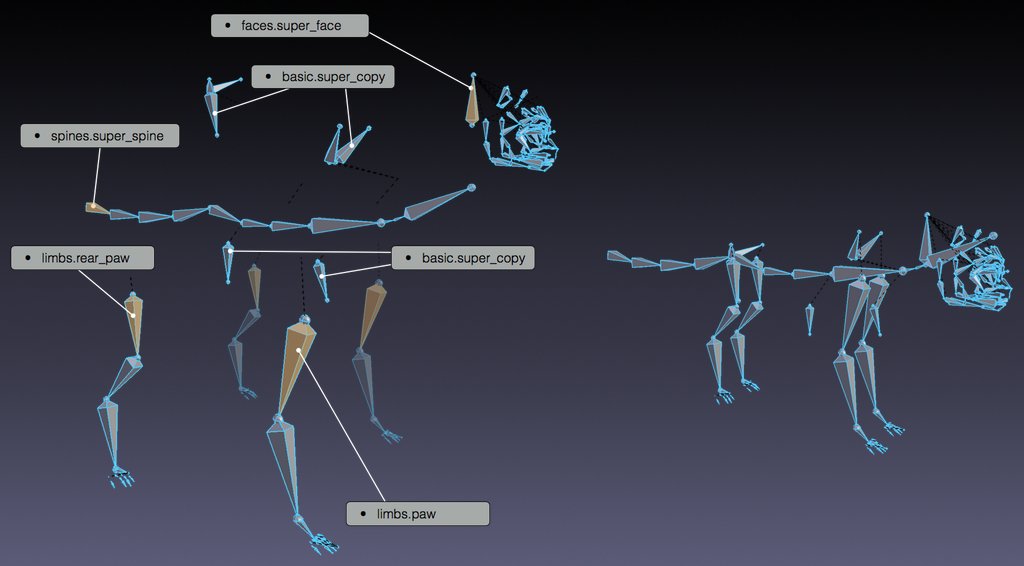
Cat meta-rig built by samples.
- All the mechanics, deformation bones and widget are created on a single click
The meta-rig contains more information than the visualized bones. In fact at generation time Rigify will identify each sub-rig type and depending on the selected options will create all the sophisticated controls, switches, and deforming bones with a single click.
Creating a new Meta-rig
Add a new Armature Object
Reference – Довідка
- Mode – Режим:
Object Mode – Режим Об’єкта
- Menu – Меню:
- Shortcut – Шоткат:
Shift-A
Building your own meta-rig from scratch requires an armature object to work with. Just add a single bone from the Add menu.
Порада
At this stage naming the newly added armature metarig is a good idea.
You can do it at any time (or not at all) but it’s suggested to do it before going on
so it will always be clear on which armature you have to work when editing the meta-rig structure.
Editing the Armature
Now that there is an armature object to work – with the armature selected – enter armature Edit Mode. Building a meta-rig from scratch in Edit Mode can be done in two ways:
Adding rig samples.
Creating bone chains.
Adding Samples (Basic)
Adding pre-defined samples in Edit Mode is a good way to start building a meta-rig. This way you can become familiar with the available building blocks and how they are meant to be used. To add a rig sample:
Go in the armature tab.
Scroll down to Rigify panel.
Select a sample from the list.
Click on the Add sample button.
Edit the bone positions to match your character.
For the list of available samples, see the Rig Types page.
Using Rig Types (Advanced)
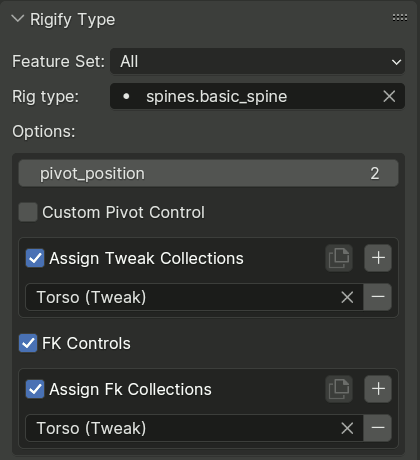
For full control, you can use the Rigify Type panel of bone properties in Pose Mode to assign any Rigify sub-rig type to any bone, as well as change its options.
For the list of available sub-rig types and their options, see the Rig Types page.
At the top of the panel you can find a field specifying the rig type for the active bone. The drop-down list can be optionally filtered by the Feature Set it belongs to.
Below that you can change options relevant to the selected rig type, if it has any.
Bone Collection References
Some rig types that generate many control bones have options that reference Bone Collections. These reference lists have a standard UI with the following features:
A checkbox controlling whether the reference should be used.
A button to copy the reference list contents from the active to all selected bones.
A plus button to add a new reference to the list.
A list of references, each entry with a field to specify the target collection, and a button to remove the entry from the list.
Примітка
Each sub rig has a required number of bones as input. If you are unsure on how to use rig-types properties, add a rig sample to your armature to see how it is supposed to be used.
Preserved Bone Properties
Certain properties of the metarig bones are often copied to the generated rig control, deform and mechanism bones.
The exact set depends on the sub-rig and the specific generated bone, and the sub-rig may override some properties even when it preserves others from the same subset, but there are certain common patterns:
- Parenting Settings
This subset consists of the parent ORG bone, Use Connect, Use Inherit Rotation, Use Local Location, and Inherit Scale.
It is usually copied to deform bones, FK controls, and in other cases where the sub-rig doesn’t have a reason to completely override them.
- Bendy Bone Settings (Edit Mode)
Consist of the segment count, Vertex Mapping Mode, Ease In/Out, Roll In/Out, Curve In/Out and Scale In/Out.
The segment count is often overridden via a sub-rig option, but other settings are usually copied to deform bones as is.
- Transformation Settings
Consist of the rotation mode, pose mode rotation values, and channel locks.
These settings are usually copied to FK controls.
- Custom Properties – Кастомні Властивості
Usually copied to one of the controls generated based on the metarig bone (mainly FK). Intra-armature drivers that access the property are retargeted to the copied instance.
- Custom Widget
Usually copied to one of the controls generated based on the metarig bone (mainly FK), and suppresses automatic generation of a widget for the bone if specified.
Custom Root Bone
If the meta-rig contains a bone called root, it is used as the root control bone instead of creating a new one.
This allows changing the rest position of the root bone, assigning a custom widget,
or adding custom properties to the bone.
The custom root bone must have no parent, and use the basic.raw_copy sub-rig type or none.
Color Sets
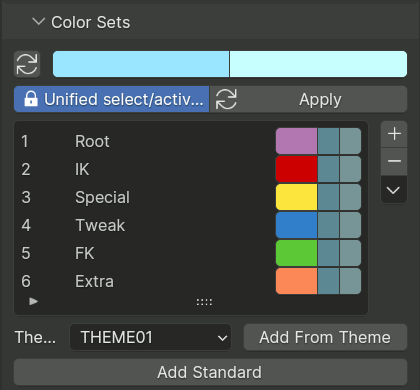
The Color Sets panel is used to define the bone color scheme for the final rig. The colors from the list can be associated with bone collections from the relevant panel.
The top two rows of the Color Sets panel are used to define the general behavior of the bone colors. Usually color themes use a gradient of colors to define the different bone states: default, selected and active. When multiple color themes are used in the same rig, identifying which bone is selected or active can be tricky since each color will have its corresponding state.
To override this behavior Rigify unifies the active and selected states using the same color. This is defined by two values:
- Unified Selected/Active Colors
When this option is active adding a bone group in the list will always keep the colors consistent. When a color scheme is added from a theme, the color scheme is loaded as is. Click on the Apply button to force the system to unify selected and active colors.
- Selected/Active Colors
This two color fields define respectively the Selected and Active colors. By default Rigify reads these colors from the theme defined by the user in the Blender preferences. This way the Selected/Active colors can always have a predictable and consistent behavior in the UI. The colors can be customized by clicking on the relevant color field. To reset them to the Blender current theme value just click on the button with the update icon.
Color Sets can be added and deleted by clicking on the + or - buttons.
All color sets can be deleted at once by clicking on the Specials menu.
To add the colors from the predefined Rigify default color scheme (as shown in the image) to the list click the Add Standard button.
To add a specific theme with its own color scheme, select it from the list and click on the Add From Theme button.
Bone Collections UI
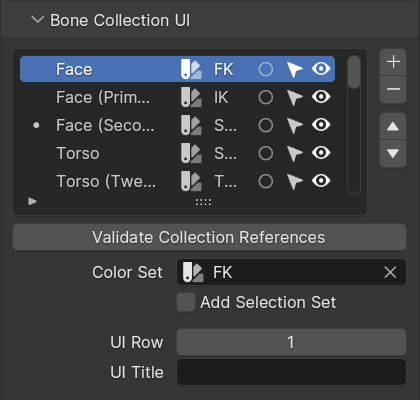
Bone Collections are used to group related bones together so that they can be hidden or revealed together.
Rigify can take advantage of collections to generate extra features and the user interface for the final rig. A panel named Rig Layers is generated with buttons for hiding the collections, arranged in an intuitive layout.
The Bone Collections UI panel allows configuring the layout of that generated panel, as well as specifying some other settings for bone collections, such as the color set to use.
The top of the panel is occupied by a list that duplicates the main bone collection list, but displays additional properties, such as the color set, whether the collection has a button, or whether it generates a selection set.
- Validate Collection References
Some sub-rig types have references to bone collections in their properties. Rigify uses a referencing scheme that is robust to collection renames, but deleting collections or joining armatures can still lead to broken references.
This button runs a scan that validates and normalizes all collection references, reporting any errors, and reducing the chance of breakage being caused by subsequent user actions.
This scan is also performed automatically every time the rig is generated.
Попередження
To avoid breakage this operation should be used both immediately before and after joining two metarig armatures. More specifically, it must be always done between the actions of renaming any collections and joining.
- Color Set
Specifies the color set to use for bones in this collection. If a bone belongs to multiple collections, in general the collection located earlier in the list has priority.
- Add Selection Set
Specifies whether a selection set should be generated for this collection.
- UI Row
If nonzero, specifies which row of the Rig Layers panel should contain the button controlling the visibility of this collection. When zero, no button is generated, and the collection is hidden.
- UI Title
This field can be used to override the title used on the UI button to be distinct from the true collection name. Unlike collection names, titles are not required to be unique, so this can be used to reduce clutter by relying on contextual cues within the panel.
UI Layout sub-panel
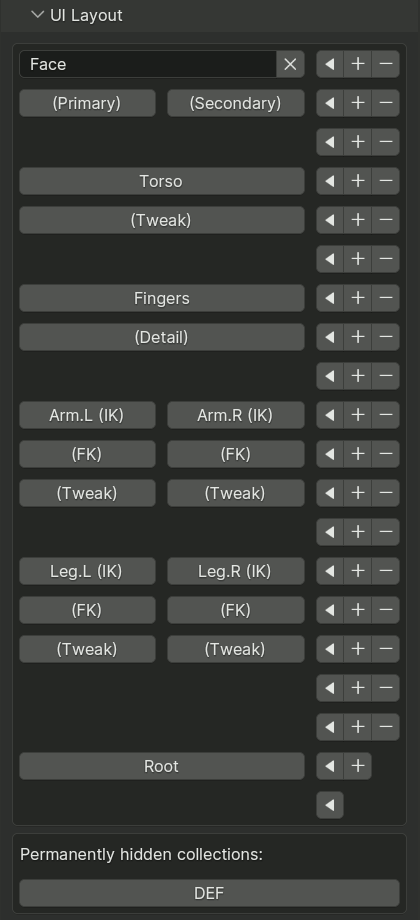
The UI Layout sub-panel provides a WYSIWYG editor for the layout of the generated UI panel (as defined by the UI Row and UI Title settings above).
Each row contains three buttons at the end:
- Arrow
Moves the active collection button to this row.
- Plus
Inserts a new row before the current one.
- Minus
Removes the current row and shifts all buttons up.
To the left of the editing control buttons, rows display buttons corresponding to the collections, same as the final UI, except that rather than hiding or unhiding, clicking these buttons selects the collection.
For the active collection the selection button is replaced with an input field for editing the UI Title, and an X button to unassign the collection from the UI.
For any collections not assigned to the UI, their select buttons are displayed in a separate section at the bottom of the sub-panel.
The Root collection will be added and/or assigned a UI button automatically if necessary when the rig is
generated. If desired, it is possible to manually assign UI buttons to the internal ORG, DEF and MCH
collections.
Порада
Blank rows appear much thinner in the final interface, since they don’t have to contain editing buttons, and can be used as logical separators.
Actions – Дії
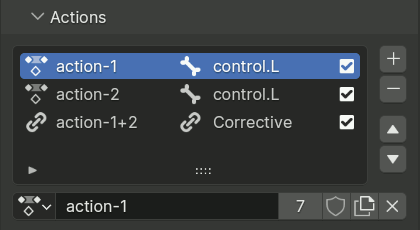
The Action constraint allows applying poses defined by an action to bones based on the transformation of another bone. This requires adding the constraint to every bone affected by the action, which is very tedious. For this reason, Rigify includes a system to do this automatically through the Actions panel.
The panel defines a list of actions to be applied to the generated rig bones. Each action must be listed only once.
The list entries show the name of the action, the trigger (a bone or a corrective action driven by two others), and a checkbox that can be used to temporarily disable applying this action to the rig. The icon at the start of the entry is changed from an action icon to a link icon to highlight corrective actions that depend on the active normal one, or normal actions used by the active corrective action.
Примітка
The Action constraints are added to the bones in such an order as to exactly reproduce the intended deformation, assuming the actions were created (posed and keyframed) in the order listed.
Normal Actions
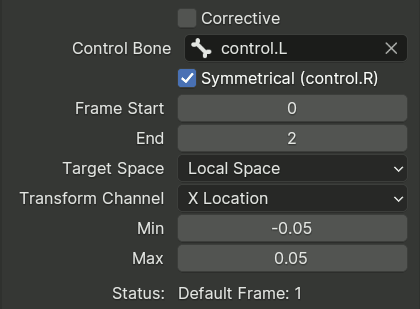
Normal actions are applied based on the transformation of a specific control bone from the generated rig. They have the following properties:
- Control Bone
Specifies the bone that drives the action.
- Symmetrical
If the control bone has a suffix that specifies that it belongs to the left or right side, this option can be enabled to automatically apply symmetry.
When enabled, left-side bones keyframed in the action will be controlled by the left-side control, and right-side bones by the right side control. Bones that don’t have a a side suffix are assumed to belong to the center of the character. They are rigged with two Action constraints with influence 0.5 that are controlled by each of the control bones.
- Frame Start & End
Specifies the frame range of the action that will be used by the created constraints.
- Target Space, Transform Channel
Specifies the coordinate space and transformation channel of the target bone that should be used.
- Min, Max – Мін, Макс
Specifies the range of the transformation channel values that is mapped to the specified action frame range.
- Default Frame
Shows the frame within the action that maps to the neutral value (1 for scale and 0 otherwise) of the transformation channel, as computed from the specified range values.
Corrective Actions

Corrective actions are applied based on the progress of two other actions from the list, and are used to improve the pose when they are used together.
- Frame Start & End
Specifies the frame range of the action that will be used by the created constraints.
- Trigger A & B
Specifies the two actions that control the correction. The interface rows contain buttons to show the settings for that action, or jump to it in the list.
The progress of the corrective action from the start to the end frame is calculated as the product of the progress values of the two trigger actions. Thus, the start frame is applied when either of the triggers is at the start frame, and the end frame is used when both are at their end frame.
Corrective actions must be below their triggers in the list, which is enforced via an implicit reorder even if violated.
Порада
Corrective actions behave in the most intuitive way when both triggers have the Default Frame equal to Start Frame. To create a corrective action in such case:
Create the two trigger actions, add them to the panel and generate the rig.
Pose your controls so that both trigger actions are fully activated to the end frame.
Pose and keyframe the necessary corrections in the end frame of the new action, while keying the start frame to the neutral values.
Add the newly created action to the end of the list in the panel and configure its settings.